说到移动设备,里面的多媒体资源想必是很多人的兴趣所在,多媒体资源一般包括视频、音频和图片等。本节主要讲Android开发中访问和操作音频与视频的方法。
Android为音频和视频操作分别提供了MediaPlayer类和MediaRecorder类这两个工具类,本文就为大家演示如何使用这两个类操作音频和视频。
一、简单音乐播放器
1、新建一个项目Lesson28_Music,主Activity的名字是MainMusic.java。
2、拷贝以下这几张图片到res/drawable目录下,并建立3个xml文件,拷贝love.mp3到res/raw文件中。


play.xml:
- <?xml version="1.0" encoding="utf-8"?>
- <SELECTOR xmlns:android="http://schemas.android.com/apk/res/android">
- <ITEM android:state_enabled="false" android:drawable="@drawable/play_disable" /> <!-- state_enabled=false -->
- <ITEM android:drawable="@drawable/play_50" /> <!-- default -->
- </SELECTOR>
pause.xml:
- <?xml version="1.0" encoding="utf-8"?>
- <SELECTOR xmlns:android="http://schemas.android.com/apk/res/android">
- <ITEM android:state_enabled="false" android:drawable="@drawable/pause_disable" /> <!-- state_enabled=false -->
- <ITEM android:drawable="@drawable/pause_50" /> <!-- default -->
- </SELECTOR>
stop.xml:
- <?xml version="1.0" encoding="utf-8"?>
- <SELECTOR xmlns:android="http://schemas.android.com/apk/res/android">
- <ITEM android:state_enabled="false" android:drawable="@drawable/stop_disable" /> <!-- state_enabled=false -->
- <ITEM android:drawable="@drawable/stop_50" /> <!-- default -->
- </SELECTOR>
3、res/layout/main.xml 的内容如下:
- <?xml version="1.0" encoding="utf-8"?>
- <LINEARLAYOUT xmlns:android="http://schemas.android.com/apk/res/android" android:layout_height="fill_parent" android:layout_width="fill_parent" android:orientation="vertical">
- <TEXTVIEW android:layout_height="wrap_content" android:layout_width="fill_parent" android:text="简单音乐播放器" android:textsize="25sp" />
- </LINEARLAYOUT>
- <LINEARLAYOUT xmlns:android="http://schemas.android.com/apk/res/android" android:layout_height="fill_parent" android:layout_width="fill_parent" android:orientation="horizontal">
- <IMAGEBUTTON android:layout_height="wrap_content" android:layout_width="wrap_content" android:background="@drawable/play" android:id="@+id/play" android:adjustviewbounds="true" android:layout_margin="4dp">
- </IMAGEBUTTON>
- <IMAGEBUTTON android:layout_height="wrap_content" android:layout_width="wrap_content" android:background="@drawable/pause" android:id="@+id/pause" android:adjustviewbounds="true" android:layout_margin="4dp">
- </IMAGEBUTTON>
- <IMAGEBUTTON android:layout_height="wrap_content" android:layout_width="wrap_content" android:background="@drawable/stop" android:id="@+id/stop" android:adjustviewbounds="true" android:layout_margin="4dp">
- </IMAGEBUTTON>
- </LINEARLAYOUT>
4、MainMusic.java的内容如下:
- package android.basic.lesson28;
- import java.io.IOException;
- import android.app.Activity;
- import android.media.MediaPlayer;
- import android.media.MediaPlayer.OnCompletionListener;
- import android.media.MediaPlayer.OnPreparedListener;
- import android.os.Bundle;
- import android.view.View;
- import android.view.View.OnClickListener;
- import android.widget.ImageButton;
- import android.widget.Toast;
- public class MainMusic extends Activity {
- // 声明变量
- private ImageButton play, pause, stop;
- private MediaPlayer mPlayer;
- /** Called when the activity is first created. */
- @Override
- public void onCreate(Bundle savedInstanceState) {
- super.onCreate(savedInstanceState);
- setContentView(R.layout.main);
- // 定义UI组件
- play = (ImageButton) findViewById(R.id.play);
- pause = (ImageButton) findViewById(R.id.pause);
- stop = (ImageButton) findViewById(R.id.stop);
- // 按钮先全部失效
- play.setEnabled(false);
- pause.setEnabled(false);
- stop.setEnabled(false);
- // 定义单击监听器
- OnClickListener ocl = new View.OnClickListener() {
- @Override
- public void onClick(View v) {
- switch (v.getId()) {
- case R.id.play:
- // 播放
- Toast.makeText(MainMusic.this, "点击播放", Toast.LENGTH_SHORT).show();
- play();
- break;
- case R.id.pause:
- // 暂停
- Toast.makeText(MainMusic.this, "暂停播放", Toast.LENGTH_SHORT).show();
- pause();
- break;
- case R.id.stop:
- // 停止
- Toast.makeText(MainMusic.this, "停止播放", Toast.LENGTH_SHORT).show();
- stop();
- break;
- }
- }
- };
- // 绑定单击监听
- play.setOnClickListener(ocl);
- pause.setOnClickListener(ocl);
- stop.setOnClickListener(ocl);
- // 初始化
- initMediaPlayer();
- }
- // 初始化播放器
- private void initMediaPlayer() {
- // 定义播放器
- mPlayer = MediaPlayer.create(getApplicationContext(), R.raw.love);
- // 定义资源准备好的监听器
- mPlayer.setOnPreparedListener(new OnPreparedListener() {
- @Override
- public void onPrepared(MediaPlayer mp) {
- // 资源准备好了再让播放器按钮有效
- Toast.makeText(MainMusic.this, "onPrepared", Toast.LENGTH_SHORT)
- .show();
- play.setEnabled(true);
- }
- });
- // 定义播放完成监听器
- mPlayer.setOnCompletionListener(new OnCompletionListener() {
- @Override
- public void onCompletion(MediaPlayer mp) {
- Toast.makeText(MainMusic.this, "onCompletion",
- Toast.LENGTH_SHORT).show();
- stop();
- }
- });
- }
- // 停止播放
- private void stop() {
- mPlayer.stop();
- pause.setEnabled(false);
- stop.setEnabled(false);
- try {
- mPlayer.prepare();
- mPlayer.seekTo(0);
- play.setEnabled(true);
- } catch (IllegalStateException e) {
- e.printStackTrace();
- } catch (IOException e) {
- e.printStackTrace();
- }
- }
- // 播放
- private void play() {
- mPlayer.start();
- play.setEnabled(false);
- pause.setEnabled(true);
- stop.setEnabled(true);
- }
- // 暂停
- private void pause() {
- mPlayer.pause();
- play.setEnabled(true);
- pause.setEnabled(false);
- stop.setEnabled(true);
- }
- // Activity销毁前停止播放
- @Override
- protected void onDestroy() {
- super.onDestroy();
- if (stop.isEnabled()) {
- stop();
- }
- }
- }
5、运行程序,查看效果。
二、简单视频播放器
Android为视频播放提供了VideoView和MediaController两个现成的组件,让我们可以方便的实现MP4、3GP等视频的播放。下面我们通过一个例子来看一下:
1、新建一个项目Lesson28_Video。
2、使用Format Factory这个软件压缩一个视频备用,我这里压缩的参数如下:

注意,如果播放时完全无法播放或者只有声音没有图像,你就需要换压缩软件和调整压缩参数重新压缩视频了,暂时只能这样,我也是折腾了2-3小时都是黑屏,郁闷中(似乎得出一个答案,是否黑屏和机器设备的性能有关,我降低压缩分辨率和每秒帧数,出图像音画同步,如果提高每秒帧数,声音出来后十几秒图像才会出来,但是出来后音画还是同步的,有兴趣的朋友可以多测试测试给出一个结论)。
用命令行的方式拷贝此视频到存储卡(sdcard)中,为什么不用eclipse中的可视化工具拷贝呢?因为那个方式靠大文件的时候经常失败,而命令行方式我没拷贝失败一次过。命令就是 adb push ,具体截个图给你看:

3、res\layout\main.xml的内容如下:
- <?xml version="1.0" encoding="utf-8"?>
- <LINEARLAYOUT xmlns:android="http://schemas.android.com/apk/res/android" android:layout_height="match_parent" android:layout_width="match_parent" android:orientation="vertical" android:layout_gravity="top">
- <VIDEOVIEW android:layout_height="fill_parent" android:layout_width="fill_parent" android:id="@+id/VideoView01">
- </VIDEOVIEW>
- </LINEARLAYOUT>
4、MainVideo.java的内容如下:
- package android.basic.lesson28;
- import android.app.Activity;
- import android.net.Uri;
- import android.os.Bundle;
- import android.view.Window;
- import android.view.WindowManager;
- import android.widget.MediaController;
- import android.widget.VideoView;
- public class MainVideo extends Activity {
- /** Called when the activity is first created. */
- @Override
- public void onCreate(Bundle savedInstanceState) {
- super.onCreate(savedInstanceState);
- //全屏
- this.getWindow().setFlags(WindowManager.LayoutParams.FLAG_FULLSCREEN, WindowManager.LayoutParams.FLAG_FULLSCREEN);
- //标题去掉
- this.requestWindowFeature(Window.FEATURE_NO_TITLE);
- //要在全屏等设置完毕后再加载布局
- setContentView(R.layout.main);
- //定义UI组件
- VideoView videoView = (VideoView) findViewById(R.id.VideoView01);
- //定义MediaController对象
- MediaController mediaController = new MediaController(this);
- //把MediaController对象绑定到VideoView上
- mediaController.setAnchorView(videoView);
- //设置VideoView的控制器是mediaController
- videoView.setMediaController(mediaController);
- //这两种方法都可以 videoView.setVideoPath("file:///sdcard/love_480320.mp4");
- videoView.setVideoURI(Uri.parse("/sdcard/love_480320.mp4"));
- //启动后就播放
- videoView.start();
- }
- }
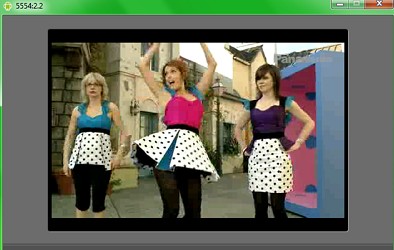
5、运行效果如下:
三、简单录音程序
1、新建一个一个项目Tip_Recorder,主activity名字是MainActivity。
2、其布局文件main.xml的代码是:
- <?xml version="1.0" encoding="utf-8"?>
- <LINEARLAYOUT xmlns:android="http://schemas.android.com/apk/res/android" android:layout_height="fill_parent" android:layout_width="fill_parent" android:orientation="vertical" android:gravity="center">
- <BUTTON type=submit android:layout_height="wrap_content" android:layout_width="wrap_content" android:text="录音" android:textsize="30sp" android:id="@+id/Button01"></BUTTON>
- <BUTTON type=submit android:layout_height="wrap_content" android:layout_width="wrap_content" android:text="停止" android:textsize="30sp" android:id="@+id/Button02" android:layout_margintop="20dp"></BUTTON>
- </LINEARLAYOUT>
3、主程序文件 MainActivity.java的代码如下:
- package android.tip.yaoyao;
- import java.io.File;
- import java.io.IOException;
- import java.util.Calendar;
- import java.util.Locale;
- import android.app.Activity;
- import android.media.MediaRecorder;
- import android.os.Bundle;
- import android.text.format.DateFormat;
- import android.view.View;
- import android.widget.Button;
- import android.widget.Toast;
- public class MainActivity extends Activity {
- private Button recordButton;
- private Button stopButton;
- private MediaRecorder mr;
- @Override
- public void onCreate(Bundle savedInstanceState) {
- super.onCreate(savedInstanceState);
- setContentView(R.layout.main);
- recordButton = (Button) this.findViewById(R.id.Button01);
- stopButton = (Button) this.findViewById(R.id.Button02);
- // 录音按钮点击事件
- recordButton.setOnClickListener(new View.OnClickListener() {
- @Override
- public void onClick(View v) {
- File file = new File("/sdcard/"
- + "YY"
- + new DateFormat().format("yyyyMMdd_hhmmss",
- Calendar.getInstance(Locale.CHINA)) + ".amr");
- Toast.makeText(getApplicationContext(), "正在录音,录音文件在"+file.getAbsolutePath(), Toast.LENGTH_LONG)
- .show();
- // 创建录音对象
- mr = new MediaRecorder();
- // 从麦克风源进行录音
- mr.setAudioSource(MediaRecorder.AudioSource.DEFAULT);
- // 设置输出格式
- mr.setOutputFormat(MediaRecorder.OutputFormat.DEFAULT);
- // 设置编码格式
- mr.setAudioEncoder(MediaRecorder.AudioEncoder.DEFAULT);
- // 设置输出文件
- mr.setOutputFile(file.getAbsolutePath());
- try {
- // 创建文件
- file.createNewFile();
- // 准备录制
- mr.prepare();
- } catch (IllegalStateException e) {
- e.printStackTrace();
- } catch (IOException e) {
- e.printStackTrace();
- }
- // 开始录制
- mr.start();
- recordButton.setText("录音中……");
- }
- });
- // 停止按钮点击事件
- stopButton.setOnClickListener(new View.OnClickListener() {
- @Override
- public void onClick(View v) {
- if (mr != null) {
- mr.stop();
- mr.release();
- mr = null;
- recordButton.setText("录音");
- Toast.makeText(getApplicationContext(), "录音完毕", Toast.LENGTH_LONG).show();
- }
- }
- });
- }
- }
4、因为录音和写存储卡都需要权限声明,所以这里也把AndroidManifest.xml代码提供出来:
- <?xml version="1.0" encoding="utf-8"?>
- <MANIFEST android:versionname="1.0" android:versioncode="1" xmlns:android="http://schemas.android.com/apk/res/android" package="android.tip.yaoyao">
- <APPLICATION android:icon="@drawable/icon" android:label="@string/app_name" android:debuggable="true">
- <ACTIVITY android:name=".MainActivity" android:label="@string/app_name" android:screenorientation="portrait" android:configchanges="orientation|keyboardHidden|keyboard">
- <INTENT -filter>
- <ACTION android:name="android.intent.action.MAIN" />
- <CATEGORY android:name="android.intent.category.LAUNCHER" />
- </INTENT>
- </ACTIVITY>
- </APPLICATION>
- <USES android:minsdkversion="4" -sdk />
- <USES android:name="android.permission.RECORD_AUDIO" -permission></USES>
- <USES android:name="android.permission.WRITE_EXTERNAL_STORAGE" -permission></USES>
- </MANIFEST>
5、编译并运行程序,查看结果。
点击录音:
录音文件在存储卡的根目录几个以YY开头的amr文件:
6、这个例子要用到录音设备,而模拟器并不能把电脑声卡模拟出来使用,因此这个例子必须在真机上进行测试。
真机上测试方法也很简单:
1)在真机上把USB调试模式打开。
2)把真机用USB线与电脑连接。
3)设置电脑和手机的连接方式为 ”仅充电“(此时手机可以操作存储卡)。
4)打开Eclipse,在不选择模拟器的情况下运行程序,此时,Eclipse会自动找到真机,并使用它运行程序,最完美的是他可以把真机运行程序的输出信息,照样输出在Eclipse中的Logcat日志中。
上面的真机截图也是通过Eclipse的DDMS窗口直接抓取的,下图中右上角颜色最深的图标就是抓取真机截图的按钮:
本节就讲到这里,内容不少,希望大家自己多加练习,熟练掌握。

发表评论:
◎欢迎参与讨论,请在这里发表您的看法、交流您的观点。