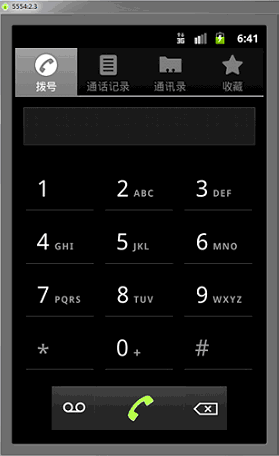
Tab标签页控件在很多编程技术中都能见到,它使得窗口显示区能够重复利用。在Android中标签页涉及到TabActivity、TabHost、TabWidget等概念。使用Tab标签页控件,可以在同一个空间里放置更多内容。譬如Android自带的拨号程序及通讯录等,就使用了Tab标签功能,如下图所示:
下面我们用实例的方式来学习如何制作上面类似的标签效果,其实还是很简单的。我同样是把解释写到示例的注释里了,注释是我的理解并不准确,方便你记忆而已。
1、新建一个项目 Lesson44_Tab ,Activity起名叫 MainActivity。
2、编写 main.xml 内容如下,这次的形式和普通布局文件有所区别,请注意看写法:
XML/HTML代码
- <?xml version="1.0" encoding="utf-8"?>
- <!-- 根元素是 TabHost ,我们这个文件要和TabActivity配合使用,在TabActivity的源代码里写死了要找的Id是android.R.id.tabhost,
- 因此这里的ID也要定死成TabHost 的ID 是定死的 "@android:id/tabhost" 下面的类似,不再解释。 -->
- <TABHOST xmlns:android="http://schemas.android.com/apk/res/android" android:id="@android:id/tabhost" android:layout_width="fill_parent" android:layout_height="fill_parent">
- <!-- TabWidget 就是标签选项卡的头部部分,注意ID的写法 -->
- <TABWIDGET android:id="@android:id/tabs" android:layout_width="fill_parent" android:layout_height="wrap_content">
- </TABWIDGET>
- <!-- FrameLayout 就是标签的内容显示部分,注意ID的写法,还要注意我们做了个上部空白设定 android:paddingTop="65dp",是为了不让内容和标签重叠 -->
- <FRAMELAYOUT android:id="@android:id/tabcontent" android:layout_width="fill_parent" android:layout_height="fill_parent" android:paddingtop="65dp">
- <!-- LinearLayout 是一个标签里的内容,程序根据你定义的ID来把他们放在不同的标签下面 -->
- <LINEARLAYOUT android:id="@+id/linearLayout1" android:layout_width="wrap_content" android:layout_height="wrap_content">
- <TEXTVIEW android:id="@+id/textView1" android:layout_width="wrap_content" android:layout_height="wrap_content" android:text="标签1中的内容">
- </TEXTVIEW>
- </LINEARLAYOUT>
- <!-- LinearLayout 是另一个标签里的内容-->
- <LINEARLAYOUT android:id="@+id/linearLayout2" android:layout_width="wrap_content" android:layout_height="wrap_content">
- <TEXTVIEW android:id="@+id/textView2" android:layout_width="wrap_content" android:layout_height="wrap_content" android:text="标签2中的内容">
- </TEXTVIEW>
- </LINEARLAYOUT>
- </FRAMELAYOUT>
- </TABHOST>
3、编写 MainActivity,请注意它继承的是 TabActivity 类,解释在代码里:
Java代码
- package basic.android.lesson44;
- import android.app.TabActivity;
- import android.os.Bundle;
- import android.widget.TabHost;
- public class MainActivity extends TabActivity {
- @Override
- public void onCreate(Bundle savedInstanceState) {
- super.onCreate(savedInstanceState);
- setContentView(R.layout.main);
- // tabHost是一个标签容器
- TabHost tabHost = this.getTabHost();
- // 每一个TabSpec对象就是个标签
- // TabSpec.setIndicator()方法是设置标签显示样式
- // TabSpec.setContent()方法显示标签下方的内容显示
- //定义第一个标签
- tabHost.addTab(tabHost.newTabSpec("OneTab")
- .setIndicator("OneTab", getResources().getDrawable(android.R.drawable.star_on))
- .setContent(R.id.linearLayout1));
- //定义第二个标签
- tabHost.addTab(tabHost.newTabSpec("TwoTab")
- .setIndicator("TwoTab", getResources().getDrawable(android.R.drawable.star_off))
- .setContent(R.id.linearLayout2));
- }
- }
4、编译程序,运行代码,查看结果:
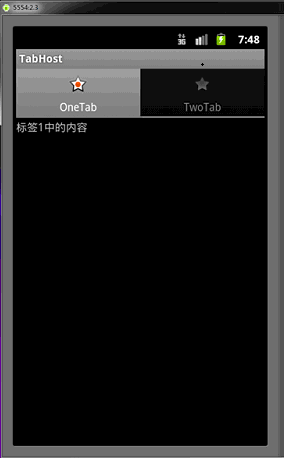
点击 TwoTab ,标签切换:

大家最好先看一遍注释,程序运行起来后再看看理解下,加深印象。本节就讲到这里了。
本文发布:Android开发网

发表评论:
◎欢迎参与讨论,请在这里发表您的看法、交流您的观点。