今天就借助官方 API的动画来扩展总结下之前学习与使用过的一些知识点,风格不变,先看效果,再看代码:
动画效果一:

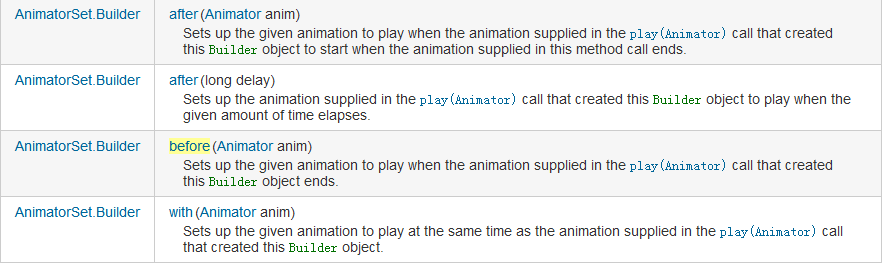
AnimatorSet.Builderl:
好了,效果看完了,但这篇文章主要看的不是这个简单的效果,大家来看下文章中的注释与解释吧。
Java代码
- package com.xiaoma.www;
- import java.util.ArrayList;
- import android.animation.Animator;
- import android.animation.AnimatorListenerAdapter;
- import android.animation.AnimatorSet;
- import android.animation.ObjectAnimator;
- import android.animation.ValueAnimator;
- import android.app.Activity;
- import android.content.Context;
- import android.graphics.Canvas;
- import android.graphics.Paint;
- import android.graphics.RadialGradient;
- import android.graphics.Shader;
- import android.graphics.drawable.ShapeDrawable;
- import android.graphics.drawable.shapes.OvalShape;
- import android.os.Bundle;
- import android.view.MotionEvent;
- import android.view.View;
- import android.view.animation.AccelerateInterpolator;
- import android.view.animation.DecelerateInterpolator;
- import android.widget.LinearLayout;
- /**
- * @Title: BoundAnimationActivity.java
- * @Package com.xiaoma.www
- * @Description: 小马API动画学习扩展
- * @author XiaoMa
- */
- public class BallAnimationActivity extends Activity {
- /**定义小球要显示的窗口*/
- private LinearLayout xiaoMaLayout = null ;
- /** Called when the activity is first created. */
- @Override
- public void onCreate(Bundle savedInstanceState) {
- super.onCreate(savedInstanceState);
- setContentView(R.layout.main);
- init();
- }
- /**
- * 初始化实现
- */
- private void init(){
- //定位动画容器资源
- xiaoMaLayout = (LinearLayout)findViewById(R.id.xiaoma);
- xiaoMaLayout.addView(new BallAnimationView(this));
- }
- /**
- * @Title: BallAnimationActivity.java
- * @Package com.xiaoma.www
- * @Description:自定义View, 文章中我会扩展一些东西,大家要仔细看注释哦
- * @author XiaoMa
- */
- public class BallAnimationView extends View{
- //由于文章排版问题,小马在此处稍微违背下注释规范,多行注释暂时用“//”来代替,大家见谅
- //这个地方大家先考虑下三个问题:(答案小马会在后面解答)
- //1:为什么要用static ?
- //2:为什么要用final ?
- //3:为什么不用注释中的Color类而用十六进制来定义这些颜色值,不是更方便吗 ?
- /**定义背景颜色更换色值*/
- private static final int RED = 0xffFF8080;
- private static final int BLUE = 0xff8080FF;
- private static final int CYAN = 0xff80ffff;
- private static final int GREEN = 0xff80ff80;
- /**private static final int RED1 = Color.RED;
- private static final int BLUE1 = Color.BLUE;
- private static final int CYAN1 = Color.CYAN;
- private static final int GREEN1 = Color.GREEN;*/
- /**
- * 这个地方解释下吧,上面三个问题的答案:1:用static可以加快访问速度,达到高效访问变量; 2:用final简单, 就是不常变;3:不用Color是因为已经是static final了,如果用了Color.XXX的话,会长期在内存中导入一个没必要的包,占用内存,浪费内存资源;这个地方小马顺带着说下,在应用中如果你经常用static来定义一些变量时,很多的变量时就会出OOM的问题啦,比如:
- * public class ClassName {
- private static Context mContext;
- }
- 上面的代码是很恶心的,我以前就在项目中就这样写过,以构造方法传递过来,以为写成静态可以方便调用对吧?其实是错的!!!如果将Activity赋值到么mContext的话。即使该Activity已经onDestroy,但是由于仍有对象保存它的引用,因此该Activity依然不会被释放。扩展扩展有效避免OOM的几种情况:
- 第一,应该尽量避免static成员变量引用资源耗费过多的实例,比如Context。
- 第二、Context尽量使用Application Context,因为Application的Context的生命周期比较长,引用它不会出现内存泄露的问题。
- 第三、使用WeakReference代替强引用。比如可以使用WeakReference<Context> mContextRef;
- 第四、将线程的内部类,改为静态内部类。
- 第五、在线程内部采用弱引用保存Context引用。
- */
- /**声明并初始化一个小球的容器*/
- public final ArrayList<ShapeHolder> balls = new ArrayList<ShapeHolder>();
- //AnimatorSet类与AnimationSet别搞混,而且必须在3.0以上版本中才有哦...
- //此类可以根据一个特殊的顺序来播放Animator对象中的动画,而Animator则是一个
- //可以支持set结点设置动画的详细信息,如:开始、结束等...,set相信大家不是很陌生了吧
- //以下形式即:set结点动画
- /**<setandroid:ordering=["together" ¦ "sequentially"]>
- <objectAnimator
- android:propertyName="string"
- android:duration="int"
- android:valueFrom="float ¦ int ¦ color"
- android:valueTo="float ¦ int ¦ color"
- android:startOffset="int"
- android:repeatCount="int"
- android:repeatMode=["repeat" ¦ "reverse"]
- android:valueType=["intType" ¦ "floatType"]/>
- <animator
- android:duration="int"
- android:valueFrom="float ¦ int ¦ color"
- android:valueTo="float ¦ int ¦ color"
- android:startOffset="int"
- android:repeatCount="int"
- android:repeatMode=["repeat" ¦ "reverse"]
- android:valueType=["intType" ¦ "floatType"]/>
- <set>
- ...
- </set>
- </set>*/
- /**
- * 既然在文章开头说了要扩展很多东西的话,不仅仅是看个效果那么简单啦,顺带着学习回顾下动画中的详细属性:
- * 四种主要的动画类型:
- alpha 渐变透明度动画效果
- scale 渐变尺寸伸缩动画效果
- translate 画面转换位置移动动画效果
- rotate 画面转移旋转动画效果
- 四种主要的动画类型相对应的类:
- AlphaAnimation 渐变透明度动画效果
- ScaleAnimation 渐变尺寸伸缩动画效果
- TranslateAnimation 画面转换位置移动动画效果
- RotateAnimation 画面转移旋转动画效果
- 动画的XML文件在工程中res/anim目录,这个文件必须包含一个根元素,可以使<alpha><scale> <translate> <rotate>
- 插值元素或者是把上面的元素都放入<set>元素组中,默认情况下,所有的动画指令都是同时发生的,为了让他们按序列发生,需要设置一个
- 特殊的属性startOffset。动画的指令定义了你想要发生什么样的转换,当他们发生了,应该执行多长时间,转换可以是连续的也可以使同时的
- 四大节点共同属性汇总:
- 属性[类型] 功能
- Duration[long] 属性为动画持续时间 时间以毫秒为单位
- fillAfter [boolean] 当设置为true ,该动画转化在动画结束后被应用
- fillBefore[boolean] 当设置为true ,该动画转化在动画开始前被应用
- */
- /**声明播放动画控制器*/
- AnimatorSet animator = null ;
- //这个地方大家应该发现了点什么吧?想想为什么用这个构造不用下面注释的构造?
- public BallAnimationView(Context context) { //方式一
- super(context);
- //上一篇讲ObjectAnimator,这个地方大家现在应该知道ValueAnimator是干吗的了吧?吼吼
- ValueAnimator backAnim = ObjectAnimator.ofInt(this, "backgroundColor", RED,BLUE,CYAN,GREEN);
- //设置自动更换背景色的时间为每隔2秒更换一次
- backAnim.setDuration(2000);
- backAnim.setRepeatCount(ValueAnimator.INFINITE);
- backAnim.setRepeatMode(ValueAnimator.REVERSE);
- backAnim.start();
- }
- /**public BallAnimationView(Context context, AttributeSet attrs) { //方式二
- super(context, attrs);
- // TODO Auto-generated constructor stub
- }*/
- /**
- * 这个地方给出上面选择构造方法时是为什么用第一个不用第二个构造方法的原因:
- * 一:如果是用纯代码的方式加载自定义的控制到而已中时用第一种方式,
- * 二:如果是XML文件加载的方式使用自定义控件到布局中是用第二种方式,
- */
- @Override
- protected void onDraw(Canvas canvas) {
- for (int i = 0; i < balls.size(); ++i) {
- ShapeHolder shapeHolder = balls.get(i);
- canvas.save();
- //这个地方的translate()这个方法,如果朋友们要深究的话可以自行学习下,不想的话只知道怎么用就行了...
- //矩阵转换在这不多说了,因为我懂的矩阵不多,只记下这个小点:Matrix的基本操作包括:+、*。Matrix的乘法不满足交换律,也就是说A*B ≠B*A。
- canvas.translate(shapeHolder.getX(), shapeHolder.getY());
- shapeHolder.getShape().draw(canvas);
- canvas.restore(); //重置画布
- }
- super.onDraw(canvas);
- }
- /**
- * 监听触屏事件,以此来播放动画
- * */
- @Override
- public boolean onTouchEvent(MotionEvent event) {
- if(event.getAction() != MotionEvent.ACTION_DOWN
- && event.getAction() != MotionEvent.ACTION_MOVE){
- return false;
- }
- ShapeHolder newBall = addBall(event.getX(), event.getY());
- // Bouncing animation with squash and stretch
- float startY = newBall.getY();
- float endY = getHeight() - 50f;
- //获取的这个高度是当前View的高度
- float h = (float)getHeight();
- float eventY = event.getY();
- int duration = (int)(500 * ((h - eventY)/h));
- ValueAnimator bounceAnim = ObjectAnimator.ofFloat(newBall, "y", startY, endY);
- bounceAnim.setDuration(duration);
- //这个地方使用到插值器,顺带讲下几种插值器
- //打过人家门窗玻璃的人都知道,石头刚扔出时的状态是:先快先慢,以下讲到使用的插值器就是这个道理,
- //所以说有些事还是小时候练成的哦!!
- /**accelerate_decelerate_interpolator
- 加速-减速 动画插入器
- accelerate_interpolator
- 加速-动画插入器
- decelerate_interpolator
- 减速- 动画插入器*/
- //下面这些实现细节的代码小马就不一条条加注释 了,只加下比较特殊的地方
- bounceAnim.setInterpolator(new AccelerateInterpolator());
- ValueAnimator squashAnim1 = ObjectAnimator.ofFloat(newBall, "x", newBall.getX(),
- newBall.getX() - 25f);
- squashAnim1.setDuration(duration/4);
- squashAnim1.setRepeatCount(1);
- squashAnim1.setRepeatMode(ValueAnimator.REVERSE);
- squashAnim1.setInterpolator(new DecelerateInterpolator());
- ValueAnimator squashAnim2 = ObjectAnimator.ofFloat(newBall, "width", newBall.getWidth(),
- newBall.getWidth() + 50);
- squashAnim2.setDuration(duration/4);
- squashAnim2.setRepeatCount(1);
- squashAnim2.setRepeatMode(ValueAnimator.REVERSE);
- squashAnim2.setInterpolator(new DecelerateInterpolator());
- ValueAnimator stretchAnim1 = ObjectAnimator.ofFloat(newBall, "y", endY,
- endY + 25f);
- stretchAnim1.setDuration(duration/4);
- stretchAnim1.setRepeatCount(1);
- stretchAnim1.setInterpolator(new DecelerateInterpolator());
- stretchAnim1.setRepeatMode(ValueAnimator.REVERSE);
- ValueAnimator stretchAnim2 = ObjectAnimator.ofFloat(newBall, "height",
- newBall.getHeight(), newBall.getHeight() - 25);
- stretchAnim2.setDuration(duration/4);
- stretchAnim2.setRepeatCount(1);
- stretchAnim2.setInterpolator(new DecelerateInterpolator());
- stretchAnim2.setRepeatMode(ValueAnimator.REVERSE);
- ValueAnimator bounceBackAnim = ObjectAnimator.ofFloat(newBall, "y", endY,
- startY);
- bounceBackAnim.setDuration(duration);
- bounceBackAnim.setInterpolator(new DecelerateInterpolator());
- // Sequence the down/squash&stretch/up animations
- AnimatorSet bouncer = new AnimatorSet();
- //下面三个之前、之后、同一时间来添加动画,此处什么意思,我就不一句句翻译了,大家直接看官方解释就可以了,截图在动画效果三后一张:
- //如果大家想详细了解学习AnimatorSet.Builder的话可以看下下面官方这个链接...
- //http://developer.android.com/reference/android/animation/AnimatorSet.Builder.html
- bouncer.play(bounceAnim).before(squashAnim1);
- bouncer.play(squashAnim1).with(squashAnim2);
- bouncer.play(squashAnim1).with(stretchAnim1);
- bouncer.play(squashAnim1).with(stretchAnim2);
- bouncer.play(bounceBackAnim).after(stretchAnim2);
- // 看到alpha渐变了吧?当小球反弹到最后时变为全透明,并从容器中remove透明的小球
- ValueAnimator fadeAnim = ObjectAnimator.ofFloat(newBall, "alpha", 1f, 0f);
- fadeAnim.setDuration(250);
- fadeAnim.addListener(new AnimatorListenerAdapter() {
- @Override
- public void onAnimationEnd(Animator animation) {
- balls.remove(((ObjectAnimator)animation).getTarget());
- }
- });
- // 按顺序排列好其它小球的动画
- AnimatorSet animatorSet = new AnimatorSet();
- animatorSet.play(bouncer).before(fadeAnim);
- animatorSet.start();
- return true;
- }
- /***
- * 将小球添加到容器中方法实现
- * @param x
- * @param y
- * @return 添加的小球对象
- */
- private ShapeHolder addBall(float x, float y) {
- OvalShape circle = new OvalShape();
- circle.resize(50f, 50f);
- ShapeDrawable drawable = new ShapeDrawable(circle);
- ShapeHolder shapeHolder = new ShapeHolder(drawable);
- shapeHolder.setX(x - 25f);
- shapeHolder.setY(y - 25f);
- //随机取RGB三种颜色
- int red = (int)(Math.random() * 255);
- int green = (int)(Math.random() * 255);
- int blue = (int)(Math.random() * 255);
- //下面是:得到一个16进制表示的颜色,相当于:0xff(red的16进制值)(green的16进制值)(blue的16进制值)
- //比如 0xff886644 88 = red 66 = green 44 = blue这样的,第一次见到这个东西,大家记得记下哦
- int color = 0xff000000 ¦ red << 16 ¦ green << 8 ¦ blue;
- Paint paint = drawable.getPaint(); //得到画笔
- int darkColor = 0xff000000 ¦ red/4 << 16 ¦ green/4 << 8 ¦ blue/4;
- //用给定的圆心、半径、颜色和展示模式来绘制小球,这里使用的模式是:平铺模式:
- //展示模式有三种分别是:平铺模式、 平铺模式非重叠模式、 非重叠模式
- RadialGradient gradient = new RadialGradient(37.5f, 12.5f,
- 50f, color, darkColor, Shader.TileMode.CLAMP);
- //设置画笔要绘制的图片
- paint.setShader(gradient);
- //设置画笔开
- shapeHolder.setPaint(paint);
- balls.add(shapeHolder);
- return shapeHolder;
- }
- }
- }
主控制类看完了,下面来看下这个简单的辅助类,如果下:
Java代码
- package com.xiaoma.www;
- import android.graphics.Paint;
- import android.graphics.RadialGradient;
- import android.graphics.drawable.ShapeDrawable;
- import android.graphics.drawable.shapes.Shape;
- /**
- * @Title: ShapeHolder.java
- * @Package com.xiaoma.www
- * @Description: 动画辅助类
- * @author XiaoMa
- */
- public class ShapeHolder {
- private float x = 0, y = 0;
- private ShapeDrawable shape;
- private int color;
- private RadialGradient gradient;
- private float alpha = 1f;
- private Paint paint;
- public void setPaint(Paint value) {
- paint = value;
- }
- public Paint getPaint() {
- return paint;
- }
- public void setX(float value) {
- x = value;
- }
- public float getX() {
- return x;
- }
- public void setY(float value) {
- y = value;
- }
- public float getY() {
- return y;
- }
- public void setShape(ShapeDrawable value) {
- shape = value;
- }
- public ShapeDrawable getShape() {
- return shape;
- }
- public int getColor() {
- return color;
- }
- public void setColor(int value) {
- shape.getPaint().setColor(value);
- color = value;
- }
- public void setGradient(RadialGradient value) {
- gradient = value;
- }
- public RadialGradient getGradient() {
- return gradient;
- }
- public void setAlpha(float alpha) {
- this.alpha = alpha;
- shape.setAlpha((int)((alpha * 255f) + .5f));
- }
- public float getWidth() {
- return shape.getShape().getWidth();
- }
- public void setWidth(float width) {
- Shape s = shape.getShape();
- s.resize(width, s.getHeight());
- }
- public float getHeight() {
- return shape.getShape().getHeight();
- }
- public void setHeight(float height) {
- Shape s = shape.getShape();
- s.resize(s.getWidth(), height);
- }
- public ShapeHolder(ShapeDrawable s) {
- shape = s;
- }
- }
好啦,扩展看完了,如果大家有好的建议或者需要什么地方需要整理总结的,记得留言提出,看到留言会第一时间回复并总结整理出来的,谢谢啦,每天进步一点点,也算一种进步,大家加油,把工作当成自己的兴趣,才能获得源源不断的动力,加油加油!!!一起学习一起进步,这就是编程的快乐!加油…..O_O!
本文发布:Android开发网

发表评论:
◎欢迎参与讨论,请在这里发表您的看法、交流您的观点。