一、概述
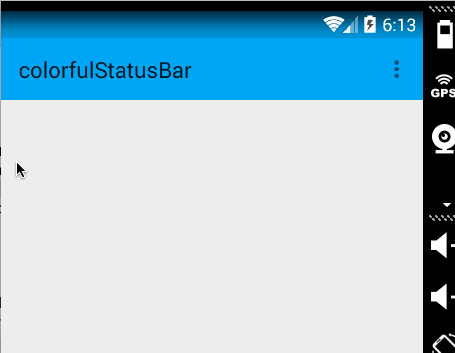
近期注意到QQ新版使用了沉浸式状态栏,ok,先声明一下:本篇博客效果下图:

关于这个状态栏变色到底叫「Immersive Mode」/「Translucent Bars」有兴趣可以去了解下。
恩,接下来正题。
首先只有大于等于4.4版本支持这个半透明状态栏的效果,但是4.4和5.0的显示效果有一定的差异,所有本篇博文内容为:
如何实现半透明状态栏效果在大于4.4版本之上。
如何让4.4的效果与5.0的效果尽可能一致。
看了不少参考文章,都介绍到这个库,大家可以了解:SystemBarTint。
不过本篇博文并未基于此库,自己想了个hack,对于此库源码有空再看了。
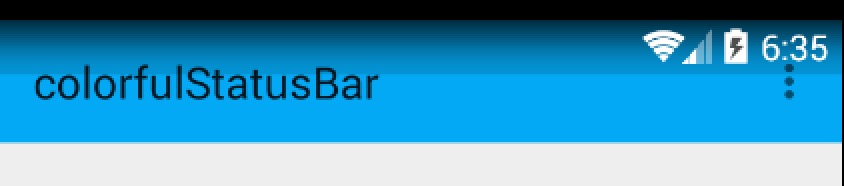
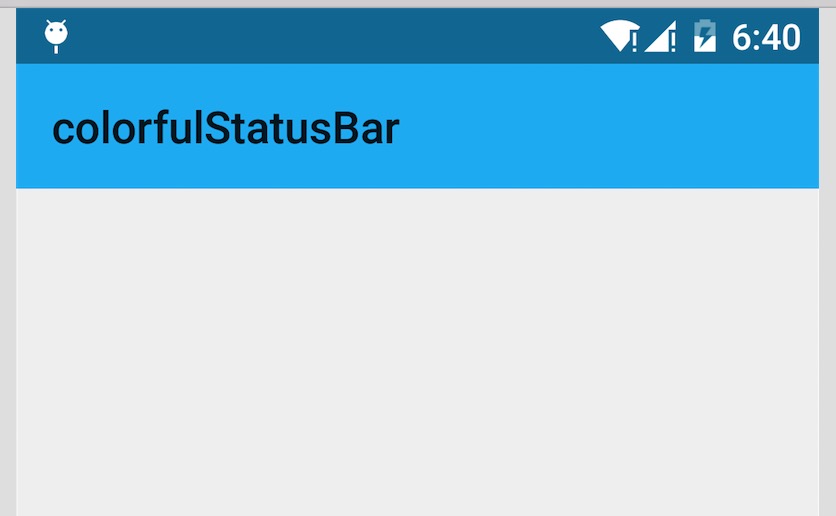
二、效果图
先贴下效果图,以便和实现过程中做下对比
4.4 模拟器
5.x 真机
ok,有了效果图之后就开始看实现了。
三、实现半透明状态栏
因为本例使用了NavigationView,所以布局代码稍多,当然如果你不需要,可以自己进行筛减。
注意引入相关依赖:
- compile 'com.android.support:appcompat-v7:22.2.1'
- compile 'com.android.support:support-v4:22.2.1'
- compile 'com.android.support:design:22.2.0'
(一)colors.xml 和 styles.xml
首先我们定义几个颜色:
res/values/color.xml
- <?xml version="1.0" encoding="utf-8"?>
- <resources>
- <color name="primary">#FF03A9F4</color>
- <color name="primary_dark">#FF0288D1</color>
- <color name="status_bar_color">@color/primary_dark</color>
- </resources>
下面定义几个styles.xml
注意文件夹的路径:
values/styles.xml
- <resources>
- <style name="BaseAppTheme" parent="Theme.AppCompat.Light.NoActionBar">
- <!-- Customize your theme here. -->
- <item name="colorPrimary">@color/primary</item>
- <item name="colorPrimaryDark">@color/primary_dark</item>
- <item name="colorAccent">#FF4081</item>
- </style>
- <!-- Base application theme. -->
- <style name="AppTheme" parent="@style/BaseAppTheme">
- </style>
- </resources>
values-v19
- <resources>
- <style name="AppTheme" parent="@style/BaseAppTheme">
- <item name="android:windowTranslucentStatus">true</item>
- </style>
- </resources>
ok,这个没撒说的。注意我们的主题是基于NoActionBar的,android:windowTranslucentStatus这个属性是v19开始引入的。
(二)布局文件
activity_main.xml
- <android.support.v4.widget.DrawerLayout
- xmlns:android="http://schemas.android.com/apk/res/android"
- xmlns:app="http://schemas.android.com/apk/res-auto"
- xmlns:tools="http://schemas.android.com/tools"
- android:layout_width="match_parent"
- android:layout_height="match_parent"
- >
- <LinearLayout
- android:id="@+id/id_main_content"
- android:layout_width="match_parent"
- android:layout_height="match_parent"
- android:orientation="vertical">
- <android.support.v7.widget.Toolbar
- android:id="@+id/id_toolbar"
- android:layout_width="match_parent"
- android:layout_height="wrap_content"
- android:background="?attr/colorPrimary"
- android:fitsSystemWindows="true"
- app:popupTheme="@style/ThemeOverlay.AppCompat.Light"/>
- <TextView
- android:id="@+id/id_tv_content"
- android:layout_width="match_parent"
- android:layout_height="0dp"
- android:layout_weight="1"
- android:gravity="center"
- android:text="HelloWorld"
- android:textSize="30sp"/>
- </LinearLayout>
- <android.support.design.widget.NavigationView
- android:id="@+id/id_nv_menu"
- android:layout_width="match_parent"
- android:layout_height="match_parent"
- android:layout_gravity="start"
- android:fitsSystemWindows="true"
- app:headerLayout="@layout/header_just_username"
- app:menu="@menu/menu_drawer"
- />
- </android.support.v4.widget.DrawerLayout>
DrawerLayout内部一个LinearLayout作为内容区域,一个NavigationView作为菜单。
注意下Toolbar的高度设置为wrap_content。
然后我们的NavigationView中又依赖一个布局文件和一个menu的文件。
header_just_username.xml
- <?xml version="1.0" encoding="utf-8"?>
- <RelativeLayout xmlns:android="http://schemas.android.com/apk/res/android"
- android:layout_width="match_parent"
- android:layout_height="192dp"
- android:background="?attr/colorPrimaryDark"
- android:orientation="vertical"
- android:padding="16dp"
- android:fitsSystemWindows="true"
- android:theme="@style/ThemeOverlay.AppCompat.Dark">
- <TextView
- android:id="@+id/id_link"
- android:layout_width="wrap_content"
- android:layout_height="wrap_content"
- android:layout_alignParentBottom="true"
- android:layout_marginBottom="16dp"
- android:text="http://blog.csdn.net/lmj623565791"/>
- <TextView
- android:id="@+id/id_username"
- android:layout_width="wrap_content"
- android:layout_height="wrap_content"
- android:layout_above="@id/id_link"
- android:text="Zhang Hongyang"/>
- <ImageView
- android:layout_width="72dp"
- android:layout_height="72dp"
- android:layout_above="@id/id_username"
- android:layout_marginBottom="16dp"
- android:src="@mipmap/ic_launcher"/>
- </RelativeLayout>
menu的文件就不贴了,更加详细的可以去参考Android 自己实现 NavigationView [Design Support Library(1)]。
大体看完布局文件以后,有几个点要特别注意:
• ToolBar高度设置为wrap_content
• ToolBar添加属性android:fitsSystemWindows="true"
• header_just_username.xml的跟布局RelativeLayout,添加属性android:fitsSystemWindows="true"
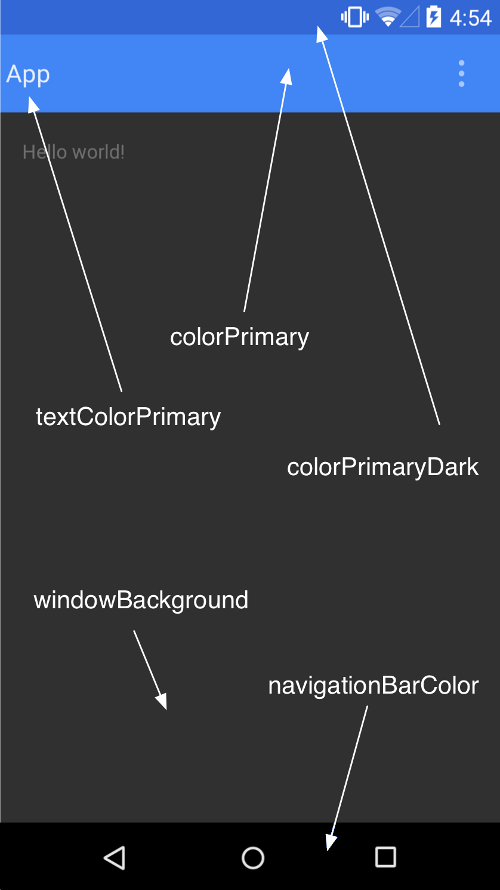
android:fitsSystemWindows这个属性,主要是通过调整当前设置这个属性的view的padding去为我们的status_bar留下空间。
根据上面的解释,如果你不写,那么状态栏和Toolbar就会有挤一块的感觉了,类似会这样:
ok,最后看下代码。
(三)Activity的代码
- package com.zhy.colorfulstatusbar;
- import android.os.Bundle;
- import android.support.v7.app.AppCompatActivity;
- import android.support.v7.widget.Toolbar;
- public class MainActivity extends AppCompatActivity
- {
- @Override
- protected void onCreate(Bundle savedInstanceState)
- {
- super.onCreate(savedInstanceState);
- setContentView(R.layout.activity_main);
- Toolbar toolbar = (Toolbar) findViewById(R.id.id_toolbar);
- setSupportActionBar(toolbar);
- //StatusBarCompat.compat(this, getResources().getColor(R.color.status_bar_color));
- //StatusBarCompat.compat(this);
- }
- }
没撒说的,就是setSupportActionBar。
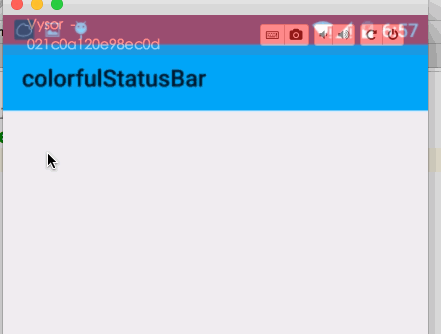
那么现在4.4的效果图是:
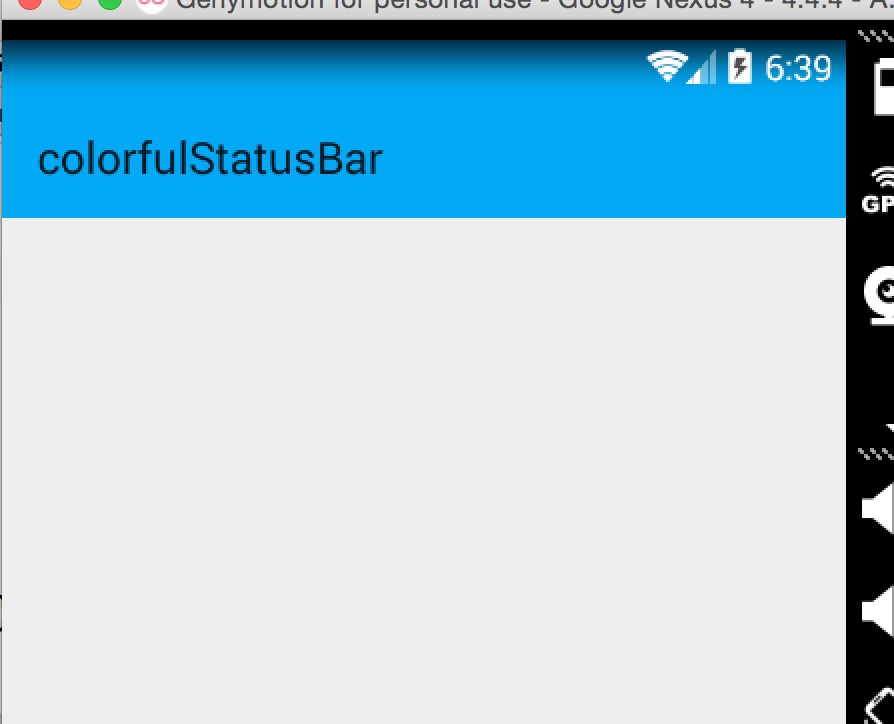
其实还不错,有个渐变的效果。
现在5.x的效果:
可以看到5.x默认并非是一个渐变的效果,类似是一个深一点的颜色。
再看看我们md的规范
状态栏应该是一个比Toolbar背景色,稍微深一点的颜色。
这么看来,我们还是有必要去为4.4做点适配工作,让其竟可能和5.x显示效果一致,或者说尽可能符合md的规范。
四、调整4.4的显示方案
那么问题来了?如何做呢?
咱们这么看,4.4之后加入windowTranslucentStatus的属性之后,也就是我们可以用到状态栏的区域了。
既然我们可以用到这块区域,那么我们只要在根布局去设置一个与状态栏等高的View,设置背景色为我们期望的颜色就可以了。
于是有了以下的代码:
- package com.zhy.colorfulstatusbar;
- import android.annotation.TargetApi;
- import android.app.Activity;
- import android.content.Context;
- import android.graphics.Color;
- import android.os.Build;
- import android.view.View;
- import android.view.ViewGroup;
- /**
- * Created by zhy on 15/9/21.
- */
- public class StatusBarCompat
- {
- private static final int INVALID_VAL = -1;
- private static final int COLOR_DEFAULT = Color.parseColor("#20000000");
- @TargetApi(Build.VERSION_CODES.LOLLIPOP)
- public static void compat(Activity activity, int statusColor)
- {
- if (Build.VERSION.SDK_INT >= Build.VERSION_CODES.LOLLIPOP)
- {
- if (statusColor != INVALID_VAL)
- {
- activity.getWindow().setStatusBarColor(statusColor);
- }
- return;
- }
- if (Build.VERSION.SDK_INT >= Build.VERSION_CODES.KITKAT && Build.VERSION.SDK_INT < Build.VERSION_CODES.LOLLIPOP)
- {
- int color = COLOR_DEFAULT;
- ViewGroup contentView = (ViewGroup) activity.findViewById(android.R.id.content);
- if (statusColor != INVALID_VAL)
- {
- color = statusColor;
- }
- View statusBarView = new View(activity);
- ViewGroup.LayoutParams lp = new ViewGroup.LayoutParams(ViewGroup.LayoutParams.MATCH_PARENT,
- getStatusBarHeight(activity));
- statusBarView.setBackgroundColor(color);
- contentView.addView(statusBarView, lp);
- }
- }
- public static void compat(Activity activity)
- {
- compat(activity, INVALID_VAL);
- }
- public static int getStatusBarHeight(Context context)
- {
- int result = 0;
- int resourceId = context.getResources().getIdentifier("status_bar_height", "dimen", "android");
- if (resourceId > 0)
- {
- result = context.getResources().getDimensionPixelSize(resourceId);
- }
- return result;
- }
- }
代码的思路很简单,根据Activity找到android.R.content,在其中添加一个View(高度为statusbarHeight,背景色为我们设置的颜色,默认为半透明的黑色)。
那么只需要在Activity里面去写上:
- StatusBarCompat.compat(this);
就可以了。
如果你希望自己设置状态看颜色,那么就用这个方法:
- StatusBarCompat.compat(this, getResources().getColor(R.color.status_bar_color));
这样的话我们就解决了4.4到5.x的适配问题,一行代码解决,感觉还是不错的。
最后提一下,对于5.0由于提供了setStatusBarColor去设置状态栏颜色,但是这个方法不能在主题中设置windowTranslucentStatus属性。所以,可以编写一个value-v21文件夹,里面styles.xml写入:
- <resources>
- <!-- Base application theme. -->
- <style name="AppTheme" parent="@style/BaseAppTheme">
- </style>
- </resources>
其实就是不要有windowTranslucentStatus属性。
接下来,对于默认的效果就不测试了,参考上面的效果图。
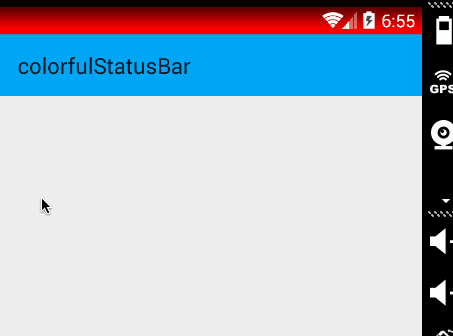
我们测试个设置状态栏颜色的,我们这里设置个红色。
4.4 模拟器
5.x 真机
ok,这样就结束啦~~
源码地址:https://github.com/hongyangAndroid/ColorfulStatusBar

发表评论:
◎欢迎参与讨论,请在这里发表您的看法、交流您的观点。