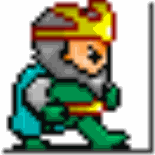
大家先要有舞台和演员的概念,下面通过一个游戏截图来说明:

请仔细观察图片中的元素,有些东西是不能动,有些可以动,有些有特效,有些没有,有各种图片,但是其实它们都可以统一称为演员(Actor)。图中用框标出的就是演员。而整个游戏界面就是我们的舞台。
演员是游戏设计中常用的一个对象,它接受舞台的统一管理,拥有一些公共的事件,比如触摸,点击,但是同时还有自身的响应和属性;而舞台就是容纳演员的场所。它统一管理所有演员,接受输入,同时提供一个方便的框架操作演员的时间变化。
Stage类
我们来看一下Stage类:
protected final Group root;
protected final SpriteBatch batch;
protected Camera camera;
它拥有一个Group,一个SpriteBatch,还有一个相机。
SpriteBatch我们在前几篇说过,这里就不再重复了。
Group是一个类,用于容纳和控制演员。但是这里要注意Group本身其实也是继承自Actor。
相机我们这里跳过,以后再说,可以暂时理解成一个控制观察视角和指标转化的工具。
当我们拥有一个演员后就可以调用addActor方法加入舞台。
舞台可以获取输入,但是需要设置。
Gdx.input.setInputProcessor(stage);
舞台和演员实例分享
下面来个列子,控制一个人物前进。
控制人物的按钮:

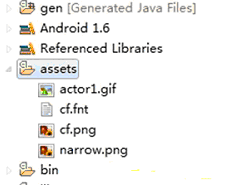
将所需的图片放到assert中:
新建三个类:
FirstGame,实现接口ApplicationListener
FirstActor,继承Actor
NarrowButton,继承Actor
先看一下FirstGame
声明一个Stage,然后实例化FirstActor和NarrowButton,将二者加入舞台中,最后设置输入响应为Stage。
- package com.cnblogs.htynkn.listener;
- import java.util.Date;
- import java.util.Random;
- import javax.microedition.khronos.opengles.GL;
- import android.util.Log;
- import com.badlogic.gdx.ApplicationListener;
- import com.badlogic.gdx.Gdx;
- import com.badlogic.gdx.graphics.GL10;
- import com.badlogic.gdx.graphics.g2d.BitmapFont;
- import com.badlogic.gdx.scenes.scene2d.Stage;
- import com.cnblogs.htynkn.domain.FirstActor;
- import com.cnblogs.htynkn.domain.NarrowButton;
- public class FirstGame implements ApplicationListener {
- private Stage stage;
- private FirstActor firstActor;
- private NarrowButton button;
- @Override
- public void create() {
- stage = new Stage(Gdx.graphics.getWidth(), Gdx.graphics.getHeight(),
- true);
- firstActor = new FirstActor("renwu");
- button = new NarrowButton("narrow");
- stage.addActor(firstActor);
- stage.addActor(button);
- Gdx.input.setInputProcessor(stage);
- }
- @Override
- public void dispose() {
- stage.dispose();
- }
- @Override
- public void pause() {
- // TODO Auto-generated method stub
- }
- @Override
- public void render() {
- Gdx.gl.glClear(GL10.GL_COLOR_BUFFER_BIT);
- stage.act(Gdx.graphics.getDeltaTime());
- stage.draw();
- }
- @Override
- public void resize(int width, int height) {
- // TODO Auto-generated method stub
- }
- @Override
- public void resume() {
- // TODO Auto-generated method stub
- }
- }
再看一下FirstActor。
声明一个Texture用于绘制。在构造方法中获取到高度和宽度,以便于后期的hit时间判断。
- package com.cnblogs.htynkn.domain;
- import com.badlogic.gdx.Gdx;
- import com.badlogic.gdx.graphics.Texture;
- import com.badlogic.gdx.graphics.g2d.SpriteBatch;
- import com.badlogic.gdx.scenes.scene2d.Actor;
- public class FirstActor extends Actor {
- Texture texture;
- @Override
- public void draw(SpriteBatch batch, float parentAlpha) {
- batch.draw(texture, this.x, this.y);
- }
- @Override
- public Actor hit(float x, float y) {
- if (x > 0 && y > 0 && this.height > y && this.width > x) {
- return this;
- } else {
- return null;
- }
- }
- @Override
- public boolean touchDown(float x, float y, int pointer) {
- // TODO Auto-generated method stub
- return false;
- }
- @Override
- public void touchDragged(float x, float y, int pointer) {
- // TODO Auto-generated method stub
- }
- @Override
- public void touchUp(float x, float y, int pointer) {
- // TODO Auto-generated method stub
- }
- public FirstActor(String name) {
- super(name);
- texture = new Texture(Gdx.files.internal("actor1.gif"));
- this.height = texture.getHeight();
- this.width = texture.getWidth();
- }
- }
NarrowButton中代码绘制部分和上面的以下,主要是有个点击后控制人物行动的问题。
修改touchDown事件:
通过Group获取到FirstActor,控制x值。
- public boolean touchDown(float x, float y, int pointer) {
- Actor actor = this.parent.findActor("renwu");
- actor.x += 10;
- return false;
- }
效果:
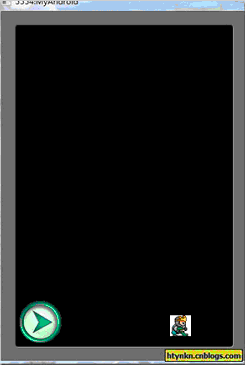
到此为止一个最简单的人物控制我们已经实现了。但是这个有实例还有很多可以改进的地方,比如方向按钮没有点击效果,人物没有移动效果。
我们可以使用Animation来实现。添加一张图片:
具体的原理我们看一下Animation类:
- public class Animation {
- final TextureRegion[] keyFrames;
- public float frameDuration;
- /** Constructor, storing the frame duration and key frames.
- *
- * @param frameDuration the time between frames in seconds.
- * @param keyFrames the {@link TextureRegion}s representing the frames. */
- public Animation (float frameDuration, List keyFrames) {
- this.frameDuration = frameDuration;
- this.keyFrames = new TextureRegion[keyFrames.size()];
- for(int i = 0, n = keyFrames.size(); i < n; i++) {
- this.keyFrames[i] = (TextureRegion)keyFrames.get(i);
- }
- }
- /** Constructor, storing the frame duration and key frames.
- *
- * @param frameDuration the time between frames in seconds.
- * @param keyFrames the {@link TextureRegion}s representing the frames. */
- public Animation (float frameDuration, TextureRegion... keyFrames) {
- this.frameDuration = frameDuration;
- this.keyFrames = keyFrames;
- }
- /** Returns a {@link TextureRegion} based on the so called state time. This is the amount of seconds an object has spent in the
- * state this Animation instance represents, e.g. running, jumping and so on. The mode specifies whether the animation is
- * looping or not.
- * @param stateTime the time spent in the state represented by this animation.
- * @param looping whether the animation is looping or not.
- * @return the TextureRegion representing the frame of animation for the given state time. */
- public TextureRegion getKeyFrame (float stateTime, boolean looping) {
- int frameNumber = (int)(stateTime / frameDuration);
- if (!looping) {
- frameNumber = Math.min(keyFrames.length - 1, frameNumber);
- } else {
- frameNumber = frameNumber % keyFrames.length;
- }
- return keyFrames[frameNumber];
- }
- }
可以看出所谓的动画其实是一张一张的图片不断切换(其实所有的动画都是这个样子的)。
我们构造一个图片列表然后根据事件变动不停取出,重新绘制就形成动画了。
注意一下传入的时间和图片列表大小的问题,修改FirstActor代码如下:
- package com.cnblogs.htynkn.domain;
- import com.badlogic.gdx.Gdx;
- import com.badlogic.gdx.graphics.Texture;
- import com.badlogic.gdx.graphics.g2d.Animation;
- import com.badlogic.gdx.graphics.g2d.SpriteBatch;
- import com.badlogic.gdx.graphics.g2d.TextureRegion;
- import com.badlogic.gdx.scenes.scene2d.Actor;
- public class FirstActor extends Actor {
- Texture texture1;
- Texture texture2;
- Animation animation;
- TextureRegion[] walksFrame;
- float stateTime;
- @Override
- public void draw(SpriteBatch batch, float parentAlpha) {
- stateTime += Gdx.graphics.getDeltaTime();
- TextureRegion currentFrame = animation.getKeyFrame(stateTime, true);
- batch.draw(currentFrame, this.x, this.y);
- }
- @Override
- public Actor hit(float x, float y) {
- Gdx.app.log("INFO", x + " " + this.width);
- if (x > 0 && y > 0 && this.height > y && this.width > x) {
- return this;
- } else {
- return null;
- }
- }
- @Override
- public boolean touchDown(float x, float y, int pointer) {
- // TODO Auto-generated method stub
- return false;
- }
- @Override
- public void touchDragged(float x, float y, int pointer) {
- // TODO Auto-generated method stub
- }
- @Override
- public void touchUp(float x, float y, int pointer) {
- // TODO Auto-generated method stub
- }
- public FirstActor(String name) {
- super(name);
- texture1 = new Texture(Gdx.files.internal("actor1.gif"));
- texture2 = new Texture(Gdx.files.internal("actor2.gif"));
- this.height = texture1.getHeight();
- this.width = texture1.getWidth();
- TextureRegion region1;
- TextureRegion region2;
- region1 = new TextureRegion(texture1);
- region2 = new TextureRegion(texture2);
- walksFrame = new TextureRegion[30];
- for (int i = 0; i < 30; i++) {
- if (i % 2 == 0) {
- walksFrame[i] = region1;
- } else {
- walksFrame[i] = region2;
- }
- }
- animation = new Animation(0.25f, walksFrame);
- }
- }
效果:

这里注意一下,为什么我们要Texture转为TextureRegion。这是因为在实际开发中的图片是集成在一起的,比如所有角色要用的图片都是放在一张图里,然后分割截取的,对应的辅助方法TextureRegion.split。
另外我们可以发现NarrowButton和FirstActor中有大量代码重复了,可能有朋友觉得应该提取一下,其实libgdx已经帮我们做了,可以参考
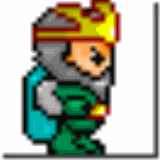
图片分享:
这里有一些常用的UI控件,估计下一篇可以讲到。

发表评论:
◎欢迎参与讨论,请在这里发表您的看法、交流您的观点。