关于图片资源的打包当然是采用TexturePacker了。官方网址:http://www.codeandweb.com/texturepacker
个人觉得是2d里面最好的资源打包工具,没有之一。
TexturePacker它是一款把若干资源图片拼接为一张大图的工具。TexturePacker可以直接选定一个文件夹,将里面的小图片生成一个大图片,并输出plist文件的工具。使用该工具,合图就非常简单了。TexturePacker自带有资源加密的功能。
关于如何使用。在此不再赘述。可自行搜索教程。
在此只想说明两点网上很少提及的:
1.命令行。
2.加密。
一、命令行
TexturePacker
界面的设置完全可以用命令行来执行。这样的好处就是完成可以批处理图片资源。前期资源是没有压缩和加密的。后期只需要替换压缩图片。使用命令行批处理一下。非常非常的方便。
1.命令行的安装。
默认安装TexturePacker 之后,命令行是没有配置到系统环境的。配置方法如下:
单击单击标题栏TexturePacker,选择安装命令行。即可。
2.TexturePacker 的一些常用参数信息
下面是TexturePacker 的一些常用参数信息。详细参数可直接在终端输入TexturePacker
- You can specify one or more .png or .tps files or directories for processing.
- <folder> Recursively adds all known files in the sprite sheet
- <*.tps> *.tps file created with TexturePackerPro (requires pro license)
- Additional set options override settings in the *.tps file
- <*.swf> Flash requires pro license
- <images> Image formats, supported:
- Output:
- --sheet <filename> Name of the sheet to write, see texture-format for formats available
- --texture-format <id> Sets the format for the textures.
- The format type is automatically derived from the sheet's file name
- if possible.
- --data <filename> Name of the data file to write
- --format <format> Format to write, default is cocos2d
- --force-publish Ignore smart update hash and force re-publishing of the files
- --texturepath <path> Adds the path to the texture file name stored in the data file.
- Use this if your sprite sheets are not stored in another folder than your data files.
- --reduce-border-artifacts Removes dark shadows around sprites
- --extrude <int> Extrudes the sprites by given value of pixels to fix flickering problems in tile maps
- --scale <float> Scales all images before creating the sheet. E.g. use 0.5 for half size
- --scale-mode <mode> Use mode for scaling:
二,图片加密
接下来讲述资源加密的一些技巧, 关于图片加密其实TexturePacker官方有详细的指导说明,官方有一篇文档有完整的介绍。
http://www.codeandweb.com/texturepacker/contentprotection
不过,cocosBuilder作者已经不再维护Builder了。所以教程对应的cocos2d 2.x 有些过时。所以在此重新啰嗦一下.
查看cocos2dx源代码发现加密的关键部分:大致意思就是用密钥循环异或data字节。
- // encrypt first part completely
- for(; i < len && i < securelen; i++)
- {
- data[i] ^= s_uEncryptionKey[b++];
- if(b >= enclen)
- {
- b = 0;
- }
- }
- // encrypt second section partially
- for(; i < len; i += distance)
- {
- data[i] ^= s_uEncryptionKey[b++];
- if(b >= enclen)
- {
- b = 0;
- }
- }
1.效果预览:
首先看一下,资源包加密VS未加密预览的效果:

VS

采用TexturePacker加密之后,资源是无法被查看到的。
Ps:在开发的过程中,可以采用未加密的资源开发,之后再打包发布的时候,采用命令行批处理一遍即可。
2.资源加密步骤:
1.单击ContentProtection旁边的Lock图标。弹出lock窗口:
你需要填写32位的密钥(0-9 a-f)
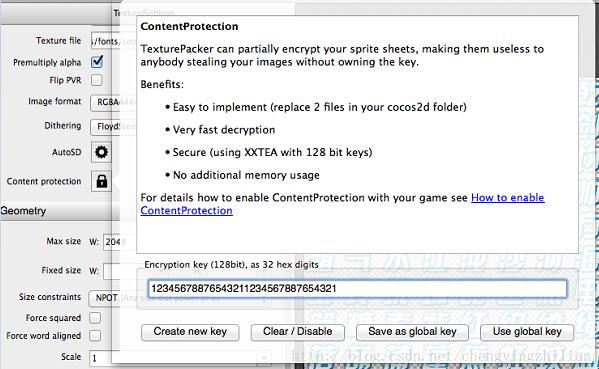
Create new key 是系统随机密钥
Clear/Disable 启用/关闭图片加密功能
Save as global key 将该密钥作为全局的密钥,以后对其他的图片加密直接使用global key 即可。
Use global key 使用保存的全局密钥。
2.Save
3.Publish
接下来的步骤和官方的介绍不同:主要是3.0已经集成了图片加密的功能。
首先需要了解:
如果你的密钥是aaaaaaaabbbbbbbbccccccccdddddddd,你必须将它们分成4部分每部分8位:
0xaaaaaaaa
0xbbbbbbbb
0xcccccccc
0xdddddddd
在TexturePacker官网介绍的方法是下载其提供的ZipUtils 文件替换cocos2dx 。在最新版的cocos2dx zipUtils 里面已经集成了对TexturePacker 解密的处理,所以无需按照其步骤处理。
Ps:下载其ZipUtils 复制替换后,cocos2dx lib 会出错。
我们直接使用coco2d-x-3.0自带的可以了。下面是对其解密的源代码:
- cocos2dx/support/zip_support/ZipUtils.h
- /** Sets the pvr.ccz encryption key.
- *
- * Example: If the key used to encrypt the pvr.ccz file is
- * 0xaaaaaaaabbbbbbbbccccccccdddddddd you will call this function with
- * the key split into 4 parts as follows
- *
- * ZipUtils::ccSetPvrEncryptionKey(0xaaaaaaaa, 0xbbbbbbbb, 0xcccccccc, 0xdddddddd);
- *
- * Note that using this function makes it easier to reverse engineer and
- * discover the complete key because the key parts are present in one
- * function call.
- *
- * IMPORTANT: Be sure to call ccSetPvrEncryptionKey or
- * ccSetPvrEncryptionKeyPart with all of the key parts *before* loading
- * the spritesheet or decryption will fail and the spritesheet
- * will fail to load.
- *
- * @param keyPart1 the key value part 1.
- * @param keyPart2 the key value part 2.
- * @param keyPart3 the key value part 3.
- * @param keyPart4 the key value part 4.
- */
- static void ccSetPvrEncryptionKey(unsigned int keyPart1, unsigned int keyPart2, unsigned int keyPart3, unsigned int keyPart4);
Ps: 在ZipUtils 中还有其他类似的函数。使用其中一个即可。
调用:
我们在AppDelegate.cpp applicationDidFinishLaunching函数中增加如下代码:
- ZipUtils::ccSetPvrEncryptionKey(0x12345678,0x87654321,0x12345678,0x87654321);
就可以正常使用资源了。
下面是Lua 使用资源的测试代码:
- require "Cocos2d"
- cclog = function(...)
- print(string.format(...))
- end
- -- for CCLuaEngine traceback
- function __G__TRACKBACK__(msg)
- cclog("----------------------------------------")
- cclog("LUA ERROR: " .. tostring(msg) .. "\n")
- cclog(debug.traceback())
- cclog("----------------------------------------")
- end
- local function createShowSpriteScene()
- cc.SpriteFrameCache:getInstance():addSpriteFrames("files/sprite.plist")
- local showSprite = cc.Sprite:createWithSpriteFrameName("success_1.png")
- showSprite:setPosition(cc.p(200,200))
- return showSprite
- end
- local function main()
- -- avoid memory leak
- collectgarbage("setpause", 100)
- collectgarbage("setstepmul", 5000)
- local scene = cc.Scene:create()
- local layer = createShowSpriteScene()
- scene:addChild(layer)
- cc.Director:getInstance():runWithScene(scene)
- end
- xpcall(main, __G__TRACKBACK__)
当我们注释在AppDelegate.cpp中,添加的代码后:会报如下错误:


发表评论:
◎欢迎参与讨论,请在这里发表您的看法、交流您的观点。