由于经常会在网上或群里看到有朋友会问线程方面的东西,就像我一个朋友他们老师讲的,J2SE、J2EE里面使用的线程方面的东西可能不是太多 ,但是在Android开发里面,玩的就是线程(UI Thread)! 好了,废话就说这么多吧,直入正题!今天要讲的东西就是线程池、线程的高效率使用,灵活控制!今天死马我就用最常用的几种方式来分别实现应用中使用的线程方面的知识,(共写了两个不同入口的Activity来分开不同的实现方式,大家可以自行注释AndroidManifest.xml中的Launch入口或打开注释)好了,先随便列几个吧,如:AsyncTask 、Runnable 、Thread、ThreadPool、 Executors等等的使用,看我文章的朋友应该都很清楚我的方式啦,果断先上效果,再一步步分解代码,来吧,效果图如下:
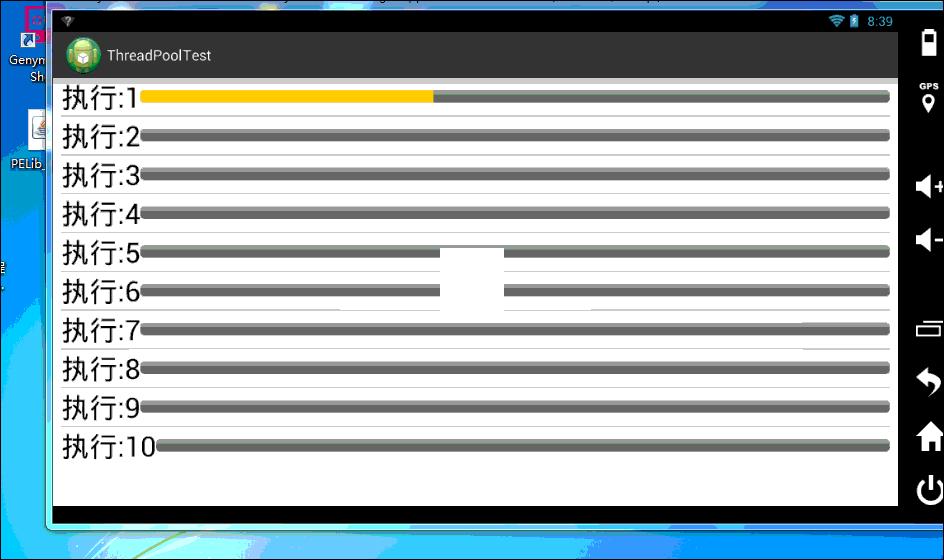
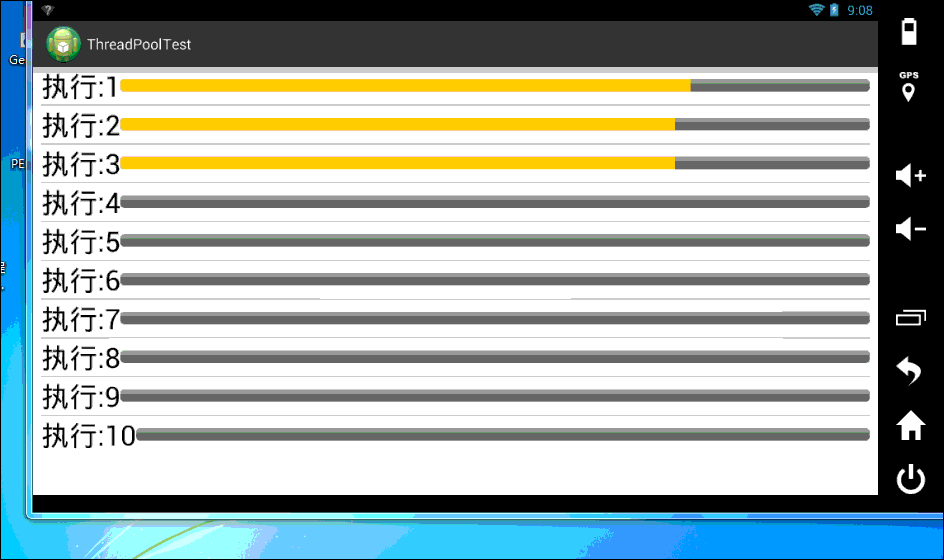
一:无大小限制的线程池执行效果如下
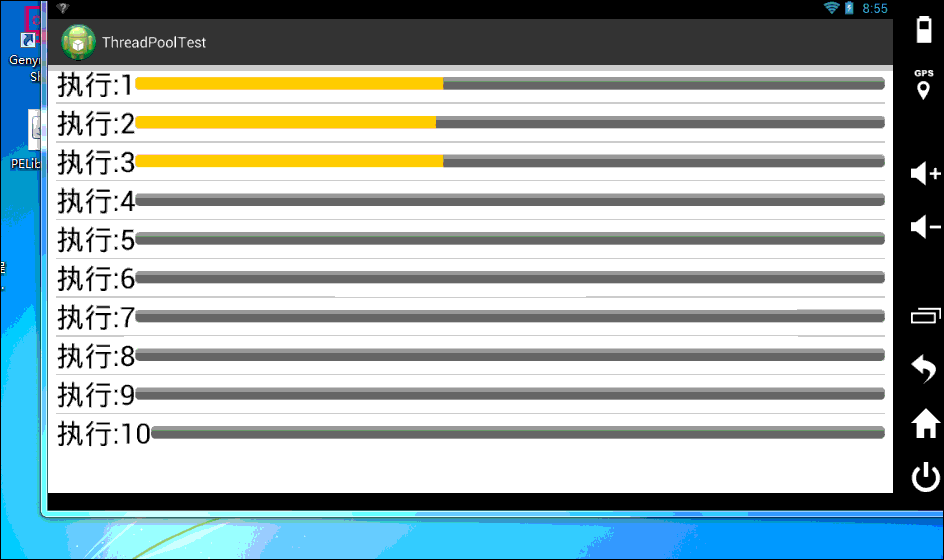
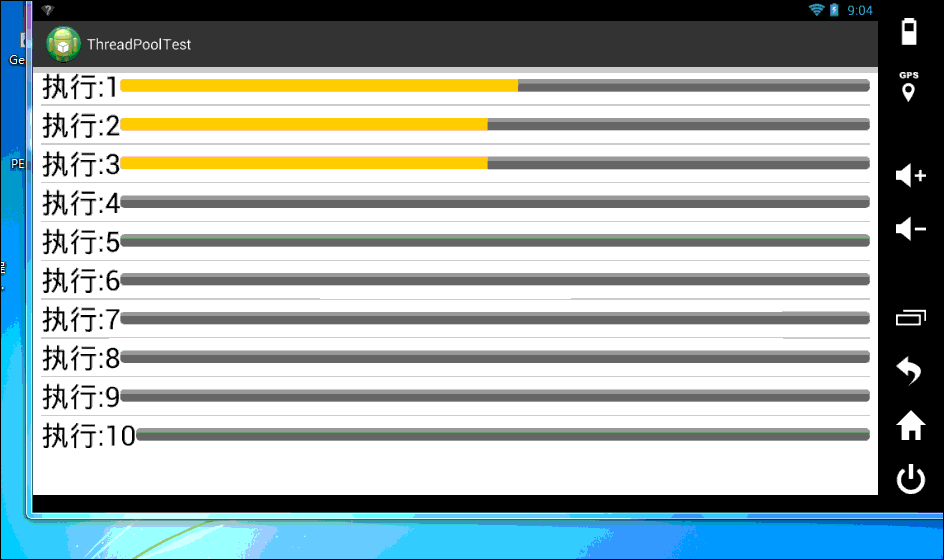
二:限制按顺序来执行任务的线程池效果如下

三:一个一个任务的执行线程池效果如下(与按顺序执行效果是一样的,只是内部实现稍有不同)
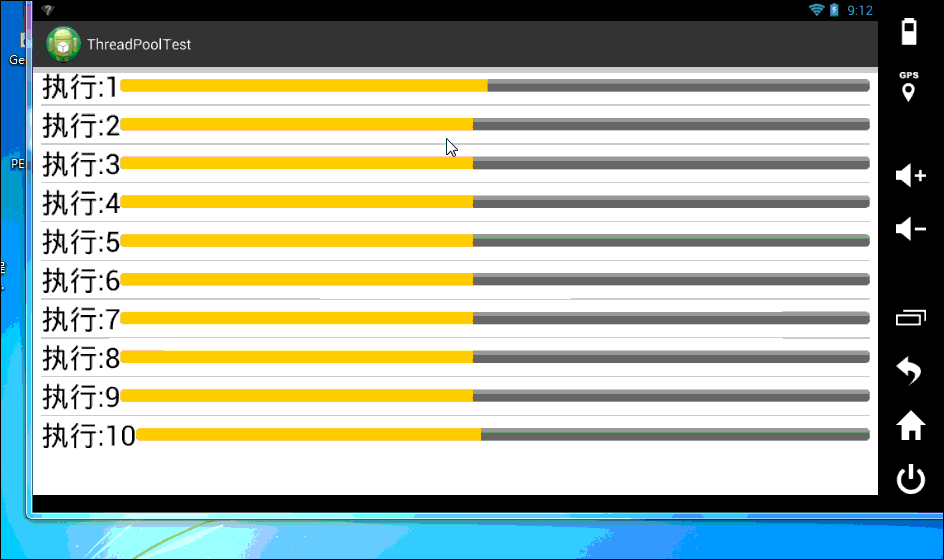
四:按指定个数来执行任务的线程池效果如下
五:创建一个可在指定时间里执行任务的线程池,亦可重复执行,不常用,效果与四相同
六:按指定工厂模式来执行的线程池,效果与四、五一样,但用方式六创建的线程池都有在工厂中指定的线程属性,
比如:线程名字、是否为用户线程等等属性
七:线程池中任务执行时可暂停效果图如下
八:用Runnable、ConcurrentLinkedQueue、ConcurrentMap、Future、ExecutorService关联实现的效果图如下
哦的了,效果看完了,现在就请大家自行修改AndroidManifest.xml中主Activity的入口来看两种不同方式实现的代码效果吧,首先,先贴一下Main.java类的代码,希望大家详细看里面的注释,一定要详细看,你不会吃亏的,相信我!(备注:为了写文章加注释还有查找的时候方便,把所有的主类及辅助类以内部类的形式写到一个.java文件里面了,如果朋友们觉得看着乱,不爽的话,可以自行将里面的类抽取到单独的.java文件中,几分钟搞定的事!)
方式一(纯ExecutorService、AsyncTask、Runnable关联实现相关文件如下):
1.1:主类文件(Main.java)
- /*
- * FileName: Main.java
- * CopyRight: Belong to <XiaoMaGuo Technologies > own
- * Description: <description>
- * Modify By : XiaoMaGuo ^_^
- * Modify Date: 2013-10-15
- * Follow Order No.: <Follow Order No.>
- * Modify Order No.: <Modify Order No.>
- * Modify Content: <modify content >
- */
- package com.xiaoma.threadpooltest;
- import java.util.ArrayList;
- import java.util.List;
- import java.util.concurrent.ExecutorService;
- import java.util.concurrent.Executors;
- import java.util.concurrent.ThreadFactory;
- import android.annotation.TargetApi;
- import android.app.Activity;
- import android.content.Context;
- import android.os.AsyncTask;
- import android.os.Build;
- import android.os.Bundle;
- import android.os.SystemClock;
- import android.util.AttributeSet;
- import android.util.Log;
- import android.view.LayoutInflater;
- import android.view.View;
- import android.view.ViewGroup;
- import android.widget.AdapterView;
- import android.widget.AdapterView.OnItemClickListener;
- import android.widget.BaseAdapter;
- import android.widget.LinearLayout;
- import android.widget.ListView;
- import android.widget.ProgressBar;
- import android.widget.TextView;
- import android.widget.Toast;
- /**
- * @TODO [The Class File Description]
- * @author XiaoMaGuo ^_^
- * @version [version-code, 2013-10-15]
- * @since [Product/module]
- */
- @TargetApi(Build.VERSION_CODES.HONEYCOMB)
- public class Main extends Activity
- {
- private static int order = 0;
- /** 总共多少任务(根据CPU个数决定创建活动线程的个数,这样取的好处就是可以让手机承受得住) */
- // private static final int count = Runtime.getRuntime().availableProcessors() * 3 + 2;
- /** 总共多少任务(我是在模拟器里面跑的,为了效果明显,所以写死了为10个,如果在手机上的话,推荐使用上面的那个count) */
- private static final int count = 10;
- /** 每次只执行一个任务的线程池 */
- private static ExecutorService singleTaskExecutor = null;
- /** 每次执行限定个数个任务的线程池 */
- private static ExecutorService limitedTaskExecutor = null;
- /** 所有任务都一次性开始的线程池 */
- private static ExecutorService allTaskExecutor = null;
- /** 创建一个可在指定时间里执行任务的线程池,亦可重复执行 */
- private static ExecutorService scheduledTaskExecutor = null;
- /** 创建一个可在指定时间里执行任务的线程池,亦可重复执行(不同之处:使用工程模式) */
- private static ExecutorService scheduledTaskFactoryExecutor = null;
- private List<AsyncTaskTest> mTaskList = null;
- /** 任务是否被取消 */
- private boolean isCancled = false;
- /** 是否点击并取消任务标示符 */
- private boolean isClick = false;
- /** 线程工厂初始化方式一 */
- ThreadFactory tf = Executors.defaultThreadFactory();
- /** 线程工厂初始化方式二 */
- private static class ThreadFactoryTest implements ThreadFactory
- {
- @Override
- public Thread newThread(Runnable r)
- {
- Thread thread = new Thread(r);
- thread.setName("XiaoMaGuo_ThreadFactory");
- thread.setDaemon(true); // 将用户线程变成守护线程,默认false
- return thread;
- }
- }
- static
- {
- singleTaskExecutor = Executors.newSingleThreadExecutor();// 每次只执行一个线程任务的线程池
- limitedTaskExecutor = Executors.newFixedThreadPool(3);// 限制线程池大小为7的线程池
- allTaskExecutor = Executors.newCachedThreadPool(); // 一个没有限制最大线程数的线程池
- scheduledTaskExecutor = Executors.newScheduledThreadPool(3);// 一个可以按指定时间可周期性的执行的线程池
- scheduledTaskFactoryExecutor = Executors.newFixedThreadPool(3, new ThreadFactoryTest());// 按指定工厂模式来执行的线程池
- scheduledTaskFactoryExecutor.submit(new Runnable()
- {
- @Override
- public void run()
- {
- Log.i("KKK", "This is the ThreadFactory Test submit Run! ! ! ");
- }
- });
- };
- @Override
- public void onCreate(Bundle icicle)
- {
- super.onCreate(icicle);
- setContentView(R.layout.demo);
- final ListView taskList = (ListView)findViewById(R.id.task_list);
- taskList.setAdapter(new AsyncTaskAdapter(getApplication(), count));
- taskList.setOnItemClickListener(new OnItemClickListener()
- {
- @Override
- public void onItemClick(AdapterView<?> parent, View view, int position, long id)
- {
- if (position == 0) // 以第一项为例,来测试关闭线程池
- {
- /**
- * 会关闭线程池方式一:但不接收新的Task,关闭后,正在等待 执行的任务不受任何影响,会正常执行,无返回值!
- */
- // allTaskExecutor.shutdown();
- /**
- * 会关闭线程池方式二:也不接收新的Task,并停止正等待执行的Task(也就是说, 执行到一半的任务将正常执行下去),最终还会给你返回一个正在等待执行但线程池关闭却没有被执行的Task集合!
- */
- List<Runnable> unExecRunn = allTaskExecutor.shutdownNow();
- for (Runnable r : unExecRunn)
- {
- Log.i("KKK", "未执行的任务信息:=" + unExecRunn.toString());
- }
- Log.i("KKK", "Is shutdown ? = " + String.valueOf(allTaskExecutor.isShutdown()));
- allTaskExecutor = null;
- }
- // 以第二项为例来测试是否取消执行的任务
- AsyncTaskTest sat = mTaskList.get(1);
- if (position == 1)
- {
- if (!isClick)
- {
- sat.cancel(true);
- isCancled = true;
- isClick = !isClick;
- }
- else
- {
- sat.cancel(false);
- isCancled = false;
- // isClick = false;
- isClick = !isClick;
- if (null != sat && sat.getStatus() == AsyncTask.Status.RUNNING)
- {
- if (sat.isCancelled())
- {
- sat = new AsyncTaskTest(sat.mTaskItem);
- }
- else
- {
- Toast.makeText(Main.this, "A task is already running, try later", Toast.LENGTH_SHORT)
- .show();
- }
- }
- /**
- * 由于上面测试关闭,在不重新生成allTaskExecutor的同时,会报异常(没有可以使用的线程池,故此处重新生成线程池对象)
- */
- if (allTaskExecutor == null)
- {
- allTaskExecutor = Executors.newCachedThreadPool();
- }
- sat.executeOnExecutor(allTaskExecutor); // The task is already running(这也是个异常哦,小心使用! )
- }
- }
- else
- {
- sat.cancel(false);
- isCancled = false;
- // sat.execute(sat.mTaskItem);
- // sat.executeOnExecutor(allTaskExecutor);
- }
- }
- });
- }
- /**
- * @TODO [ListView Item的条目适配器]
- * @author XiaoMaGuo ^_^
- * @version [version-code, 2013-10-22]
- * @since [Product/module]
- */
- private class AsyncTaskAdapter extends BaseAdapter
- {
- private Context mContext;
- private LayoutInflater mFactory;
- private int mTaskCount;
- public AsyncTaskAdapter(Context context, int taskCount)
- {
- mContext = context;
- mFactory = LayoutInflater.from(mContext);
- mTaskCount = taskCount;
- mTaskList = new ArrayList<AsyncTaskTest>(taskCount);
- }
- @Override
- public int getCount()
- {
- return mTaskCount;
- }
- @Override
- public Object getItem(int position)
- {
- return mTaskList.get(position);
- }
- @Override
- public long getItemId(int position)
- {
- return position;
- }
- @Override
- public View getView(int position, View convertView, ViewGroup parent)
- {
- if (convertView == null)
- {
- convertView = mFactory.inflate(R.layout.list_view_item, null);
- AsyncTaskTest task = new AsyncTaskTest((MyListItem)convertView);
- /**
- * 下面两种任务执行效果都一样,形变质不变
- * */
- // task.execute();
- // task.executeOnExecutor(AsyncTask.SERIAL_EXECUTOR);
- /**
- * 下面的方式在小于API 11级时效果是一样的,但在高版本中的稍微有点不同,可以看以下AsyncTask核心变量的定义就知道了使用如下
- * 方式时,系统会默认的采用五个一组,五个一组的方式来执行我们的任务,定义在:AsyncTask.class中,private static final int CORE_POOL_SIZE = 5;
- * */
- // use AsyncTask#THREAD_POOL_EXECUTOR is the same to older version #execute() (less than API 11)
- // but different from newer version of #execute()
- // task.executeOnExecutor(AsyncTask.THREAD_POOL_EXECUTOR);
- /**
- * 一个一个执行我们的任务,效果与按顺序执行是一样的(AsyncTask.SERIAL_EXECUTOR)
- * */
- // task.executeOnExecutor(singleTaskExecutor);
- /**
- * 按我们指定的个数来执行任务的线程池
- * */
- // task.executeOnExecutor(limitedTaskExecutor);
- /**
- * 不限定指定个数的线程池,也就是说:你往里面放了几个任务,他全部同一时间开始执行, 不管你手机受得了受不了
- * */
- task.executeOnExecutor(allTaskExecutor);
- /**
- * 创建一个可在指定时间里执行任务的线程池,亦可重复执行
- * */
- // task.executeOnExecutor(scheduledTaskExecutor);
- /**
- * 创建一个按指定工厂模式来执行任务的线程池,可能比较正规,但也不常用
- */
- // task.executeOnExecutor(scheduledTaskFactoryExecutor);
- mTaskList.add(task);
- }
- return convertView;
- }
- }
- class AsyncTaskTest extends AsyncTask<Void, Integer, Void>
- {
- private MyListItem mTaskItem;
- private String id;
- private AsyncTaskTest(MyListItem item)
- {
- mTaskItem = item;
- if (order < count || order == count)
- {
- id = "执行:" + String.valueOf(++order);
- }
- else
- {
- order = 0;
- id = "执行:" + String.valueOf(++order);
- }
- }
- @Override
- protected void onPreExecute()
- {
- mTaskItem.setTitle(id);
- }
- /**
- * Overriding methods
- */
- @Override
- protected void onCancelled()
- {
- super.onCancelled();
- }
- @Override
- protected Void doInBackground(Void... params)
- {
- if (!isCancelled() && isCancled == false) // 这个地方很关键,如果不设置标志位的话,直接setCancel(true)是无效的
- {
- int prog = 0;
- /**
- * 下面的while中,写了个分支用来做个假象(任务东西刚开始下载的时候,速度快,快下载完成的时候就突然间慢了下来的效果, 大家可以想象一下,类似
- * :PP手机助手、91手机助手中或其它手机应用中,几乎都有这个假象,开始快,结束时就下载变慢了,讲白了 就是开发的人不想让你在下载到大于一半的时候,也就是快下载完的时候去点取消,你那样得多浪费
- * !所以造个假象,让你不想去取消而已)
- */
- while (prog < 101)
- {
- if ((prog > 0 || prog == 0) && prog < 70) // 小于70%时,加快进度条更新
- {
- SystemClock.sleep(100);
- }
- else
- // 大于70%时,减慢进度条更新
- {
- SystemClock.sleep(300);
- }
- publishProgress(prog); // 更新进度条
- prog++;
- }
- }
- return null;
- }
- @Override
- protected void onPostExecute(Void result)
- {
- }
- @Override
- protected void onProgressUpdate(Integer... values)
- {
- mTaskItem.setProgress(values[0]); // 设置进度
- }
- }
- }
- /**
- * @TODO [一个简单的自定义 ListView Item]
- * @author XiaoMaGuo ^_^
- * @version [version-code, 2013-10-22]
- * @since [Product/module]
- */
- class MyListItem extends LinearLayout
- {
- private TextView mTitle;
- private ProgressBar mProgress;
- public MyListItem(Context context, AttributeSet attrs)
- {
- super(context, attrs);
- }
- public MyListItem(Context context)
- {
- super(context);
- }
- public void setTitle(String title)
- {
- if (mTitle == null)
- {
- mTitle = (TextView)findViewById(R.id.task_name);
- }
- mTitle.setText(title);
- }
- public void setProgress(int prog)
- {
- if (mProgress == null)
- {
- mProgress = (ProgressBar)findViewById(R.id.task_progress);
- }
- mProgress.setProgress(prog);
- }
- }
1.2:布局文件
- <?xml version="1.0" encoding="utf-8"?>
- <LinearLayout xmlns:android="http://schemas.android.com/apk/res/android"
- android:layout_width="match_parent"
- android:layout_height="match_parent"
- android:paddingLeft="10dip"
- android:paddingRight="10dip"
- android:orientation="vertical" >
- <ListView android:id="@+id/task_list"
- android:layout_width="fill_parent"
- android:layout_height="wrap_content"
- android:divider="#cccccc"
- android:dividerHeight="0.6dip"
- android:footerDividersEnabled="true"
- android:headerDividersEnabled="true" />
- </LinearLayout>
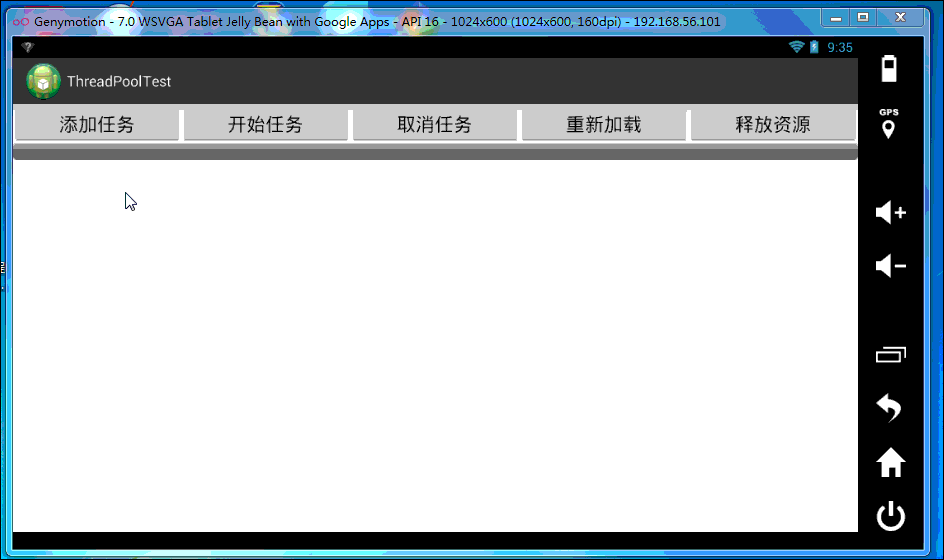
方式二(Runnable、ConcurrentLinkedQueue、ConcurrentMap、Future、ExecutorService关联实现的相关文件如 下):
2.1:主类文件(MyRunnableActivity.java)
- /*
- * FileName: MyRunnableActivity.java
- * CopyRight: Belong to <XiaoMaGuo Technologies > own
- * Description: <description>
- * Modify By : XiaoMaGuo ^_^
- * Modify Date: 2013-10-21
- * Follow Order No.: <Follow Order No.>
- * Modify Order No.: <Modify Order No.>
- * Modify Content: <modify content >
- */
- package com.xiaoma.threadpooltest;
- import java.util.Iterator;
- import java.util.Map;
- import java.util.concurrent.ConcurrentHashMap;
- import java.util.concurrent.ConcurrentLinkedQueue;
- import java.util.concurrent.ConcurrentMap;
- import java.util.concurrent.ExecutorService;
- import java.util.concurrent.Executors;
- import java.util.concurrent.Future;
- import android.app.Activity;
- import android.os.Bundle;
- import android.os.Handler;
- import android.os.Message;
- import android.util.Log;
- import android.view.View;
- import android.view.View.OnClickListener;
- import android.widget.ProgressBar;
- import android.widget.Toast;
- /**
- * @TODO [线程池控制 ]
- * @author XiaoMaGuo ^_^
- * @version [version-code, 2013-10-22]
- * @since [Product/module]
- */
- public class MyRunnableActivity extends Activity implements OnClickListener
- {
- /** 任务执行队列 */
- private ConcurrentLinkedQueue<MyRunnable> taskQueue = null;
- /**
- * 正在等待执行或已经完成的任务队列
- *
- * 备注:Future类,一个用于存储异步任务执行的结果,比如:判断是否取消、是否可以取消、是否正在执行、是否已经完成等
- *
- * */
- private ConcurrentMap<Future, MyRunnable> taskMap = null;
- /**
- * 创建一个不限制大小的线程池 此类主要有以下好处 1,以共享的无界队列方式来运行这些线程. 2,执行效率高。 3,在任意点,在大多数 nThreads 线程会处于处理任务的活动状态
- * 4,如果在关闭前的执行期间由于失败而导致任何线程终止,那么一个新线程将代替它执行后续的任务(如果需要)。
- *
- * */
- private ExecutorService mES = null;
- /** 在此类中使用同步锁时使用如下lock对象即可,官方推荐的,不推荐直接使用MyRunnableActivity.this类型的,可以详细读一下/framework/app下面的随便一个项目 */
- private Object lock = new Object();
- /** 唤醒标志,是否唤醒线程池工作 */
- private boolean isNotify = true;
- /** 线程池是否处于运行状态(即:是否被释放!) */
- private boolean isRuning = true;
- /** 任务进度 */
- private ProgressBar pb = null;
- /** 用此Handler来更新我们的UI */
- private Handler mHandler = null;
- /**
- * Overriding methods
- *
- * @param savedInstanceState
- */
- @Override
- protected void onCreate(Bundle savedInstanceState)
- {
- // TODO Auto-generated method stub
- super.onCreate(savedInstanceState);
- setContentView(R.layout.my_runnable_main);
- init();
- }
- public void init()
- {
- pb = (ProgressBar)findViewById(R.id.progressBar1);
- findViewById(R.id.button1).setOnClickListener(this);
- findViewById(R.id.button2).setOnClickListener(this);
- findViewById(R.id.button3).setOnClickListener(this);
- findViewById(R.id.button4).setOnClickListener(this);
- findViewById(R.id.button5).setOnClickListener(this);
- taskQueue = new ConcurrentLinkedQueue<MyRunnable>();
- taskMap = new ConcurrentHashMap<Future, MyRunnable>();
- if (mES == null)
- {
- mES = Executors.newCachedThreadPool();
- }
- // 用于更新ProgressBar进度条
- mHandler = new Handler()
- {
- /**
- * Overriding methods
- *
- * @param msg
- */
- @Override
- public void handleMessage(Message msg)
- {
- super.handleMessage(msg);
- pb.setProgress(msg.what);
- }
- };
- }
- /**
- * Overriding methods
- *
- * @param v
- */
- @Override
- public void onClick(View v)
- {
- switch (v.getId())
- {
- case R.id.button1:
- start();
- break;
- case R.id.button2:
- stop();
- break;
- case R.id.button3:
- reload(new MyRunnable(mHandler));
- break;
- case R.id.button4:
- release();
- break;
- case R.id.button5:
- addTask(new MyRunnable(mHandler));
- break;
- default:
- break;
- }
- }
- /**
- * <Summary Description>
- */
- private void addTask(final MyRunnable mr)
- {
- mHandler.sendEmptyMessage(0);
- if (mES == null)
- {
- mES = Executors.newCachedThreadPool();
- notifyWork();
- }
- if (taskQueue == null)
- {
- taskQueue = new ConcurrentLinkedQueue<MyRunnable>();
- }
- if (taskMap == null)
- {
- taskMap = new ConcurrentHashMap<Future, MyRunnable>();
- }
- mES.execute(new Runnable()
- {
- @Override
- public void run()
- {
- /**
- * 插入一个Runnable到任务队列中 这个地方解释一下,offer跟add方法,试了下,效果都一样,没区别,官方的解释如下: 1 offer : Inserts the specified
- * element at the tail of this queue. As the queue is unbounded, this method will never return
- * {@code false}. 2 add: Inserts the specified element at the tail of this queue. As the queue is
- * unbounded, this method will never throw {@link IllegalStateException} or return {@code false}.
- *
- *
- * */
- taskQueue.offer(mr);
- // taskQueue.add(mr);
- notifyWork();
- }
- });
- Toast.makeText(MyRunnableActivity.this, "已添加一个新任务到线程池中 !", 0).show();
- }
- /**
- * <Summary Description>
- */
- private void release()
- {
- Toast.makeText(MyRunnableActivity.this, "释放所有占用的资源!", 0).show();
- /** 将ProgressBar进度置为0 */
- mHandler.sendEmptyMessage(0);
- isRuning = false;
- Iterator iter = taskMap.entrySet().iterator();
- while (iter.hasNext())
- {
- Map.Entry<Future, MyRunnable> entry = (Map.Entry<Future, MyRunnable>)iter.next();
- Future result = entry.getKey();
- if (result == null)
- {
- continue;
- }
- result.cancel(true);
- taskMap.remove(result);
- }
- if (null != mES)
- {
- mES.shutdown();
- }
- mES = null;
- taskMap = null;
- taskQueue = null;
- }
- /**
- * <Summary Description>
- */
- private void reload(final MyRunnable mr)
- {
- mHandler.sendEmptyMessage(0);
- if (mES == null)
- {
- mES = Executors.newCachedThreadPool();
- notifyWork();
- }
- if (taskQueue == null)
- {
- taskQueue = new ConcurrentLinkedQueue<MyRunnable>();
- }
- if (taskMap == null)
- {
- taskMap = new ConcurrentHashMap<Future, MyRunnable>();
- }
- mES.execute(new Runnable()
- {
- @Override
- public void run()
- {
- /** 插入一个Runnable到任务队列中 */
- taskQueue.offer(mr);
- // taskQueue.add(mr);
- notifyWork();
- }
- });
- mES.execute(new Runnable()
- {
- @Override
- public void run()
- {
- if (isRuning)
- {
- MyRunnable myRunnable = null;
- synchronized (lock)
- {
- myRunnable = taskQueue.poll(); // 从线程队列中取出一个Runnable对象来执行,如果此队列为空,则调用poll()方法会返回null
- if (myRunnable == null)
- {
- isNotify = true;
- }
- }
- if (myRunnable != null)
- {
- taskMap.put(mES.submit(myRunnable), myRunnable);
- }
- }
- }
- });
- }
- /**
- * <Summary Description>
- */
- private void stop()
- {
- Toast.makeText(MyRunnableActivity.this, "任务已被取消!", 0).show();
- for (MyRunnable runnable : taskMap.values())
- {
- runnable.setCancleTaskUnit(true);
- }
- }
- /**
- * <Summary Description>
- */
- private void start()
- {
- if (mES == null || taskQueue == null || taskMap == null)
- {
- Log.i("KKK", "某资源是不是已经被释放了?");
- return;
- }
- mES.execute(new Runnable()
- {
- @Override
- public void run()
- {
- if (isRuning)
- {
- MyRunnable myRunnable = null;
- synchronized (lock)
- {
- myRunnable = taskQueue.poll(); // 从线程队列中取出一个Runnable对象来执行,如果此队列为空,则调用poll()方法会返回null
- if (myRunnable == null)
- {
- isNotify = true;
- // try
- // {
- // myRunnable.wait(500);
- // }
- // catch (InterruptedException e)
- // {
- // e.printStackTrace();
- // }
- }
- }
- if (myRunnable != null)
- {
- taskMap.put(mES.submit(myRunnable), myRunnable);
- }
- }
- }
- });
- }
- private void notifyWork()
- {
- synchronized (lock)
- {
- if (isNotify)
- {
- lock.notifyAll();
- isNotify = !isNotify;
- }
- }
- }
- }
2.2:辅助类(MyRunnable.java)
- /*
- * FileName: MyRunnable.java
- * CopyRight: Belong to <XiaoMaGuo Technologies > own
- * Description: <description>
- * Modify By : XiaoMaGuo ^_^
- * Modify Date: 2013-10-21
- * Follow Order No.: <Follow Order No.>
- * Modify Order No.: <Modify Order No.>
- * Modify Content: <modify content >
- */
- package com.xiaoma.threadpooltest;
- import android.os.Handler;
- import android.os.SystemClock;
- import android.util.Log;
- /**
- * @TODO [The Class File Description]
- * @author XiaoMaGuo ^_^
- * @version [version-code, 2013-10-21]
- * @since [Product/module]
- */
- public class MyRunnable implements Runnable
- {
- private boolean cancleTask = false;
- private boolean cancleException = false;
- private Handler mHandler = null;
- public MyRunnable(Handler handler)
- {
- mHandler = handler;
- }
- /**
- * Overriding methods
- */
- @Override
- public void run()
- {
- Log.i("KKK", "MyRunnable run() is executed!!! ");
- runBefore();
- if (cancleTask == false)
- {
- running();
- Log.i("KKK", "调用MyRunnable run()方法");
- }
- runAfter();
- }
- /**
- * <Summary Description>
- */
- private void runAfter()
- {
- Log.i("KKK", "runAfter()");
- }
- /**
- * <Summary Description>
- */
- private void running()
- {
- Log.i("KKK", "running()");
- try
- {
- // 做点有可能会出异常的事情!!!
- int prog = 0;
- if (cancleTask == false && cancleException == false)
- {
- while (prog < 101)
- {
- if ((prog > 0 || prog == 0) && prog < 70)
- {
- SystemClock.sleep(100);
- }
- else
- {
- SystemClock.sleep(300);
- }
- if (cancleTask == false)
- {
- mHandler.sendEmptyMessage(prog++);
- Log.i("KKK", "调用 prog++ = " + (prog));
- }
- }
- }
- }
- catch (Exception e)
- {
- cancleException = true;
- }
- }
- /**
- * <Summary Description>
- */
- private void runBefore()
- {
- // TODO Auto-generated method stub
- Log.i("KKK", "runBefore()");
- }
- public void setCancleTaskUnit(boolean cancleTask)
- {
- this.cancleTask = cancleTask;
- Log.i("KKK", "点击了取消任务按钮 !!!");
- // mHandler.sendEmptyMessage(0);
- }
- }
2.3:布局文件
- <?xml version="1.0" encoding="utf-8"?>
- <LinearLayout xmlns:android="http://schemas.android.com/apk/res/android"
- android:layout_width="match_parent"
- android:layout_height="match_parent"
- android:orientation="vertical" >
- <LinearLayout
- android:layout_width="match_parent"
- android:layout_height="wrap_content"
- android:orientation="horizontal" >
- <Button
- android:id="@+id/button5"
- android:layout_width="0dp"
- android:layout_height="wrap_content"
- android:layout_weight="1"
- android:text="添加任务" />
- <Button
- android:id="@+id/button1"
- android:layout_width="0dp"
- android:layout_height="wrap_content"
- android:layout_weight="1"
- android:text="开始任务" />
- <Button
- android:id="@+id/button2"
- android:layout_width="0dp"
- android:layout_height="wrap_content"
- android:layout_weight="1"
- android:text="取消任务" />
- <Button
- android:id="@+id/button3"
- android:layout_width="0dp"
- android:layout_height="wrap_content"
- android:layout_weight="1"
- android:text="重新加载" />
- <Button
- android:id="@+id/button4"
- android:layout_width="0dp"
- android:layout_height="wrap_content"
- android:layout_weight="1"
- android:text="释放资源" />
- </LinearLayout>
- <include layout="@layout/my_runnable_merge"/>
- </LinearLayout>
方式一、方式二的全局配置文件AndroidManifest.xml文件的配置如下:
- <?xml version="1.0" encoding="utf-8"?>
- <manifest xmlns:android="http://schemas.android.com/apk/res/android"
- package="com.xiaoma.threadpooltest"
- android:versionCode="1"
- android:versionName="1.0" >
- <uses-sdk
- android:minSdkVersion="8"
- android:targetSdkVersion="15" />
- <application
- android:allowBackup="true"
- android:icon="@drawable/ic_launcher"
- android:label="@string/app_name"
- android:theme="@style/AppTheme" >
- <activity
- android:name="Main"
- android:label="@string/app_name" >
- <!-- <intent-filter> -->
- <!-- <action android:name="android.intent.action.MAIN" /> -->
- <!-- <category android:name="android.intent.category.LAUNCHER" /> -->
- <!-- </intent-filter> -->
- </activity>
- <activity
- android:name="MyRunnableActivity"
- android:label="@string/app_name" >
- <intent-filter>
- <action android:name="android.intent.action.MAIN" />
- <category android:name="android.intent.category.LAUNCHER" />
- </intent-filter>
- </activity>
- </application>
- </manifest>
好了,今天要写内容,大体就是这些了,项目的源码大家可以到这http://mzh3344258.blog.51cto.com/1823534/1313611 里面的附件下载,WordPress里面不知道怎么上传,大家多见谅吧,还得绕个路去下载,非常抱歉! O_O 如果能仔细的将上面的东西都看完并消化的话,线程池方面的东西可能以后并不会太过为难你啦!呵呵,当然了,这些代码中写的都是一些比较简单的写法, 仅仅是使用了在线程中休眠的方式来模拟网络下载(还是个假象),如果在实际代码中使用时,尤其在释放资源这一块,不要只是单单释放了我们自己控制的线程池及其任务,还要将网络请求的Http也一同销毁(disconnection)掉哦,这样才算做到了完美!如果还有哪位朋友没有安卓源码的话,可以到这个地址查看官方在线的安卓系统源码:https://github.com/android 急急忙忙写的,如果文章中有什么地方写的不对的,真的很希望Android老鸟、菜鸟都来指点、提问,代码中若不对的,或不太合理的地方,有朋友发觉了还请及时批评指正!先在此谢谢大家啦!加油,每天进步一点,坚持总会有收获的!废话不多说了,大家晚安!…O_O…

发表评论:
◎欢迎参与讨论,请在这里发表您的看法、交流您的观点。