本文乃是一位Android开发爱好者为大家奉献的一个小人时钟的Android开发实例,作者还简单分享了自己的一些经历和想法,和Android开发学习者门共勉。以下是原文:
【写在前面】
我开始关注Android也不过是大约一年前的事,可那时在安装开发环境时遇到重挫,怎么着也没安装成功,无奈之下只好作罢。今年五一放假在家抱着试一试的心态打算重拾Android,没想到开发环境安装得非常顺利,这一下子就点燃了我一年前的热情,于是趁热打铁,一边找来几本Android入门的电子书狂啃,一边照葫芦画瓢就开始了我的Android应用程序开发之旅。几番编码下来,算是摸着点门道了,碰巧公司有个同事是个安卓控,在网上看到一款小人时钟的网页程序(如下截图),觉得非常有意思,可是遍寻安卓市场,却没发现哪儿能够下载,遂鼓动我开发一个。可怎么说我也是刚开始踏上Android开发的漫漫征程,毕竟经验不足,然而初生牛犊不怕虎,说干就开干了。

说实话,这个实例对于那些Android大虾们来说,不值一提。这个实例与其说是写给像我一样的广大菜鸟们,倒不如说是写给岁月的一曲离歌---若干年后,就让我们在记忆的尘埃里去寻找那消逝但美丽的青春。
【开发进行时】
我的开发环境是Eclipse Classic 3.7.2+Android SDK 2.3.3,具体安装过程在网上一搜一大堆,这儿就不多说了。
首先,打开Eclipse开发环境,新建一个工程,命名为“LittlePersonClock”。(Eclipse的使用,如怎么建立工程,添加文件等操作,也不在这儿介绍了)。
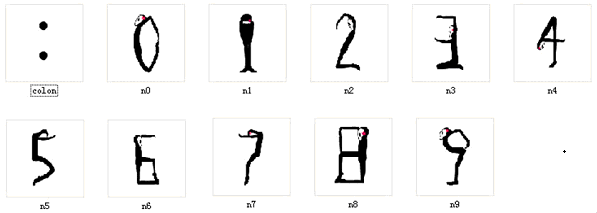
然后,将小人时钟的各个数字和“:”截图做成合适的大小(根据分辨率),如下图所示,分别命名为colon.png、n0.png……n9.png,在项目的res下新建一文件夹drawable,之后将这11张图片存放到这个drawable文件夹下面。

然后在main.xml布局文件中采用相对布局(RelativeLayout)方式,增加8个ImageView和一个Button,内容如下:
//以下是main.xml的内容
- <?xml version="1.0" encoding="UTF-8"?>
- <RelativeLayout xmlns:android="http://schemas.android.com/apk/res/android"
- android:layout_width="match_parent"
- android:layout_height="match_parent"
- android:orientation="horizontal"
- android:background="#FFFFFFFF" >
- <ImageView
- android:id="@+id/iHourHigh"
- android:layout_width="wrap_content"
- android:layout_height="wrap_content"
- android:layout_alignBottom="@+id/iHourLow"
- android:layout_marginTop="100dip"
- android:layout_marginLeft="10dip"
- android:src="@drawable/n0" >
- </ImageView>
- <ImageView
- android:id="@+id/iHourLow"
- android:layout_width="wrap_content"
- android:layout_height="wrap_content"
- android:layout_alignBottom="@+id/tColonHM"
- android:layout_marginLeft="1dip"
- android:layout_marginTop="100dip"
- android:layout_toRightOf="@id/iHourHigh"
- android:src="@drawable/n1" >
- </ImageView>
- <ImageView
- android:id="@+id/tColonHM"
- android:layout_marginTop="100dip"
- android:src="@drawable/colon"
- android:layout_width="wrap_content"
- android:layout_height="wrap_content"
- android:layout_toRightOf="@id/iHourLow"
- android:layout_marginLeft="1dip"/>
- <ImageView
- android:id="@+id/iMinuteHigh"
- android:layout_width="wrap_content"
- android:layout_height="wrap_content"
- android:layout_above="@+id/btnReturn"
- android:layout_marginLeft="1dip"
- android:layout_marginTop="100dip"
- android:layout_toRightOf="@id/tColonHM"
- android:src="@drawable/n2" >
- </ImageView>
- <ImageView
- android:id="@+id/iMinuteLow"
- android:src="@drawable/n3"
- android:layout_marginTop="100dip"
- android:layout_width="wrap_content"
- android:layout_height="wrap_content"
- android:layout_toRightOf="@id/iMinuteHigh"
- android:layout_marginLeft="1dip">
- </ImageView>
- <ImageView
- android:id="@+id/tColonMS"
- android:layout_marginTop="100dip"
- android:src="@drawable/colon"
- android:layout_width="wrap_content"
- android:layout_height="wrap_content"
- android:layout_toRightOf="@id/iMinuteLow"
- android:layout_marginLeft="1dip"/>
- <ImageView
- android:id="@+id/iSecondHigh"
- android:src="@drawable/n5"
- android:layout_marginTop="100dip"
- android:layout_width="wrap_content"
- android:layout_height="wrap_content"
- android:layout_toRightOf="@id/tColonMS"
- android:layout_marginLeft="1dip">
- </ImageView>
- <ImageView
- android:id="@+id/iSecondLow"
- android:src="@drawable/n6"
- android:layout_marginTop="100dip"
- android:layout_width="wrap_content"
- android:layout_height="wrap_content"
- android:layout_toRightOf="@id/iSecondHigh"
- android:layout_marginLeft="1dip">
- </ImageView>
- <Button
- android:id="@+id/btnExit"
- android:layout_width="wrap_content"
- android:layout_height="wrap_content"
- android:layout_below="@id/tColonMS"
- android:text="退出"
- android:layout_marginTop="50dip"
- android:layout_marginLeft="100dip"
- android:textSize="20dp"/>
- </RelativeLayout>
然后在代码LittlePersonClock.java中具体实现小人时钟。
//以下是源代码
- package com.littlepersonclock.kernel;
- import java.util.Calendar;
- import java.util.Timer;
- import java.util.TimerTask;
- import android.app.Activity;
- import android.os.Bundle;
- import android.os.Handler;
- import android.os.Message;
- import android.view.View;
- import android.widget.Button;
- import android.widget.ImageView;
- public class LittlePersonClock extends Activity {
- private ImageView ivhh=null,ivhl=null;
- private ImageView ivmh=null,ivml=null;
- private ImageView ivsh=null,ivsl=null;
- private Button btnExit=null;
- private Timer timer=new Timer();
- int i=0,hour,minute,second;
- Calendar c=null;
- int amorpm=0;
- final int did[]={R.drawable.n0,R.drawable.n1,R.drawable.n2,R.drawable.n3,R.drawable.n4,
- R.drawable.n5,R.drawable.n6,R.drawable.n7,R.drawable.n8,R.drawable.n9};
- //实际上的用法应该通过配合Handler来实现timer功能,这跟Android的线程安全有关!
- Handler handler = new Handler(){
- public void handleMessage(Message msg) {
- switch (msg.what) {
- case 1:
- c=Calendar.getInstance();
- amorpm = c.get(Calendar.AM_PM);
- hour = c.get(Calendar.HOUR);
- if(amorpm==Calendar.PM)
- hour+=12;
- minute = c.get(Calendar.MINUTE);
- second = c.get(Calendar.SECOND);
- ivhh.setImageResource(did[(int)(hour/10)]); ivhl.setImageResource(did[hour%10]);
- ivmh.setImageResource(did[(int)(minute/10)]);
- ivml.setImageResource(did[minute%10]);
- ivsh.setImageResource(did[(int)(second/10)]);
- ivsl.setImageResource(did[second%10]);
- break;
- }
- super.handleMessage(msg);
- }
- };
- TimerTask task = new TimerTask() {
- @Override
- public void run() {
- Message message = new Message();
- message.what = 1;
- handler.sendMessage(message);
- }
- };
- protected void onDestroy()
- {
- if (timer != null) {
- timer.cancel();
- timer = null;
- }
- super.onDestroy();
- }
- public void onCreate(Bundle savedInstanceState) {
- super.onCreate(savedInstanceState);
- setContentView(R.layout.main);
- ivhh = (ImageView)findViewById(R.id.iHourHigh);
- ivhl = (ImageView)findViewById(R.id.iHourLow);
- ivmh = (ImageView)findViewById(R.id.iMinuteHigh);
- ivml = (ImageView)findViewById(R.id.iMinuteLow);
- ivsh = (ImageView)findViewById(R.id.iSecondHigh);
- ivsl = (ImageView)findViewById(R.id.iSecondLow);
- c=Calendar.getInstance();
- amorpm = c.get(Calendar.AM_PM);
- hour = c.get(Calendar.HOUR);
- if(amorpm==Calendar.PM)
- hour+=12;
- minute = c.get(Calendar.MINUTE);
- second = c.get(Calendar.SECOND);
- ivhh.setImageResource(did[(int)(hour/10)]);
- ivhl.setImageResource(did[hour%10]);
- ivmh.setImageResource(did[(int)(minute/10)]);
- ivml.setImageResource(did[minute%10]);
- ivsh.setImageResource(did[(int)(second/10)]);
- ivsl.setImageResource(did[second%10]);
- timer.schedule(task,1000,1000);
- btnExit = (Button)findViewById(R.id.btnExit);
- btnExit.setOnClickListener(new Button.OnClickListener(){
- public void onClick(View v)
- {
- LittlePersonClock.this.onDestroy();
- }
- });
- }
- }
【测试效果】
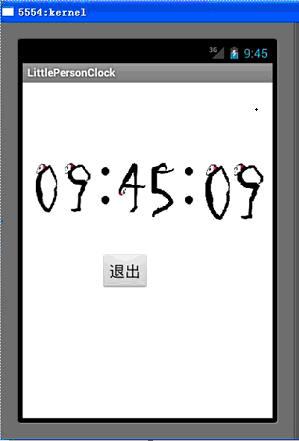
编译后打开模拟器,在模拟器上测试效果还行,以下是截图(只是无法看动态的现实):

【写在后面】
限于水平和经验,这个实例肯定还有很多不完善的地方,况且我这个人一向懒于动笔,疏于总结,本文写得也只能点到为止---要是看不懂,实在不是你的错!


发表评论:
◎欢迎参与讨论,请在这里发表您的看法、交流您的观点。