像按钮、下拉框、列表、标签、图片、复选框、编辑框、分割面板、滑动面板、滑动条等都是比较常用的UI类,它们都属于Actor,可以很方便的纳入到舞台的管理中,而且都包含在com.badlogic.gdx.scenes.scene2d.ui包中,
其实仔细看看UI类的实现代码不难发现其实它们都是大部分继承自Widget或者Table,如果需要自定义UI可以继承以上两个类(它们继承自Actor),这里要说明一下libgdx的布局部分使用了TWL,有兴趣的朋友可以去看看。
在介绍每个控件之前我们先来看一下NinePatch,这是最近的一个比较重大的更新。
何为NinePatch?其实android原生即有NinePatch类,常在按钮中使用。
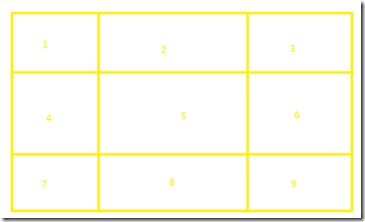
如图,将图片分成九份。中间部分可以根据需要扩大,使按钮的大小内容变动不受图片的限制。
而在libgdx的NinePatch其实就是九个TextureRegion对象。
常用的实例化方法有两个:
public NinePatch (Texture texture, int left, int right, int top, int bottom)
public NinePatch (TextureRegion region, int left, int right, int top, int bottom)
关于其中的四个int型参数如何取值我们可以参考一下源码:
- public NinePatch (TextureRegion region, int left, int right, int top, int bottom) {
- int middleWidth = region.getRegionWidth() - left - right;
- int middleHeight = region.getRegionHeight() - top - bottom;
- this.patches = new TextureRegion[] {new TextureRegion(region, 0, 0, left, top),
- new TextureRegion(region, left, 0, middleWidth, top), new TextureRegion(region, left + middleWidth, 0, right, top),
- new TextureRegion(region, 0, top, left, middleHeight), new TextureRegion(region, left, top, middleWidth, middleHeight),
- new TextureRegion(region, left + middleWidth, top, right, middleHeight),
- new TextureRegion(region, 0, top + middleHeight, left, bottom),
- new TextureRegion(region, left, top + middleHeight, middleWidth, bottom),
- new TextureRegion(region, left + middleWidth, top + middleHeight, right, bottom)};
- }
先计算中间部分的宽度和高度。然后开始切图,首先取顶部的最左边的那个,即图中编号1的那块,然后去它右边的,然后再右边的。
取完最上边的那行,然后取中间的那行,然后取最后一行的。
由上自下,由左自右。
而在绘制时又是如何处理的呢?看源码:
- public void draw (SpriteBatch batch, float x, float y, float width, float height) {
- float centerColumnX = x;
- if (patches[BOTTOM_LEFT] != null)
- centerColumnX += patches[BOTTOM_LEFT].getRegionWidth();
- else if (patches[MIDDLE_LEFT] != null)
- centerColumnX += patches[MIDDLE_LEFT].getRegionWidth();
- else if (patches[TOP_LEFT] != null) //
- centerColumnX += patches[TOP_LEFT].getRegionWidth();
- float rightColumnX = x + width;
- if (patches[BOTTOM_RIGHT] != null)
- rightColumnX -= patches[BOTTOM_RIGHT].getRegionWidth();
- else if (patches[MIDDLE_RIGHT] != null)
- rightColumnX += patches[MIDDLE_RIGHT].getRegionWidth();
- else if (patches[TOP_RIGHT] != null) //
- rightColumnX += patches[TOP_RIGHT].getRegionWidth();
- float middleRowY = y;
- if (patches[TOP_LEFT] != null)
- middleRowY += patches[TOP_LEFT].getRegionHeight();
- else if (patches[TOP_CENTER] != null)
- middleRowY += patches[TOP_CENTER].getRegionHeight();
- else if (patches[TOP_RIGHT] != null) //
- middleRowY += patches[TOP_RIGHT].getRegionHeight();
- float topRowY = y + height;
- if (patches[TOP_LEFT] != null)
- topRowY -= patches[TOP_LEFT].getRegionHeight();
- else if (patches[TOP_CENTER] != null)
- topRowY -= patches[TOP_CENTER].getRegionHeight();
- else if (patches[TOP_RIGHT] != null) //
- topRowY -= patches[TOP_RIGHT].getRegionHeight();
- // Bottom row
- if (patches[BOTTOM_LEFT] != null) batch.draw(patches[BOTTOM_LEFT], x, y, centerColumnX - x, middleRowY - y);
- if (patches[BOTTOM_CENTER] != null)
- batch.draw(patches[BOTTOM_CENTER], centerColumnX, y, rightColumnX - centerColumnX, middleRowY - y);
- if (patches[BOTTOM_RIGHT] != null)
- batch.draw(patches[BOTTOM_RIGHT], rightColumnX, y, x + width - rightColumnX, middleRowY - y);
- // Middle row
- if (patches[MIDDLE_LEFT] != null) batch.draw(patches[MIDDLE_LEFT], x, middleRowY, centerColumnX - x, topRowY - middleRowY);
- if (patches[MIDDLE_CENTER] != null)
- batch.draw(patches[MIDDLE_CENTER], centerColumnX, middleRowY, rightColumnX - centerColumnX, topRowY - middleRowY);
- if (patches[MIDDLE_RIGHT] != null)
- batch.draw(patches[MIDDLE_RIGHT], rightColumnX, middleRowY, x + width - rightColumnX, topRowY - middleRowY);
- // Top row
- if (patches[TOP_LEFT] != null) batch.draw(patches[TOP_LEFT], x, topRowY, centerColumnX - x, y + height - topRowY);
- if (patches[TOP_CENTER] != null)
- batch.draw(patches[TOP_CENTER], centerColumnX, topRowY, rightColumnX - centerColumnX, y + height - topRowY);
- if (patches[TOP_RIGHT] != null)
- batch.draw(patches[TOP_RIGHT], rightColumnX, topRowY, x + width - rightColumnX, y + height - topRowY);
- }
先计算左右栏的宽度,在计算中间和顶部的高度。然后从下自上的绘制。说实话我觉得这段代码看着很好玩的。
现在来说说几个常用的控件的使用吧。先构建一个舞台。
先来试试Label吧,label是有缓存的,所以替换显示内容不是用setText方法,而是使用setWrappedText方法。
代码如下:
- package com.cnblogs.htynkn.listener;
- import com.badlogic.gdx.ApplicationListener;
- import com.badlogic.gdx.Gdx;
- import com.badlogic.gdx.graphics.GL10;
- import com.badlogic.gdx.graphics.g2d.BitmapFont;
- import com.badlogic.gdx.graphics.g2d.BitmapFont.HAlignment;
- import com.badlogic.gdx.scenes.scene2d.Stage;
- import com.badlogic.gdx.scenes.scene2d.actors.Label;
- public class FirstGame implements ApplicationListener {
- private Stage stage;
- Label label;
- @Override
- public void create() {
- stage = new Stage(Gdx.graphics.getWidth(), Gdx.graphics.getHeight(),
- true);
- label = new Label("fpsLabel", new BitmapFont(Gdx.files.internal("cf.fnt"),Gdx.files.internal("cf.png"),false), "label1");
- label.x=5;
- label.y=Gdx.graphics.getHeight()-label.height-5;
- stage.addActor(label);
- Gdx.input.setInputProcessor(stage);
- }
- @Override
- public void dispose() {
- stage.dispose();
- }
- @Override
- public void pause() {
- // TODO Auto-generated method stub
- }
- @Override
- public void render() {
- Gdx.gl.glClear(GL10.GL_COLOR_BUFFER_BIT);
- label.setWrappedText("FPS: "+Gdx.graphics.getFramesPerSecond(),
- HAlignment.CENTER);
- stage.act(Gdx.graphics.getDeltaTime());
- stage.draw();
- }
- @Override
- public void resize(int width, int height) {
- // TODO Auto-generated method stub
- }
- @Override
- public void resume() {
- // TODO Auto-generated method stub
- }
- }
效果:

然后再看看Button吧,实例化需要一个ButtonStyle,定义了按钮三种状态对应的图片样式,按下和松开时的X,Y偏移还有Button中文字绘制所需的BitmapFont和Color。
按钮的三种状态的图片我就省了,只用一张图片。

修改代码如下:
- package com.cnblogs.htynkn.listener;
- import com.badlogic.gdx.ApplicationListener;
- import com.badlogic.gdx.Gdx;
- import com.badlogic.gdx.graphics.Color;
- import com.badlogic.gdx.graphics.GL10;
- import com.badlogic.gdx.graphics.Texture;
- import com.badlogic.gdx.graphics.g2d.BitmapFont;
- import com.badlogic.gdx.graphics.g2d.NinePatch;
- import com.badlogic.gdx.graphics.g2d.BitmapFont.HAlignment;
- import com.badlogic.gdx.scenes.scene2d.Stage;
- import com.badlogic.gdx.scenes.scene2d.actors.Label;
- import com.badlogic.gdx.scenes.scene2d.ui.Button;
- import com.badlogic.gdx.scenes.scene2d.ui.Button.ButtonStyle;
- public class FirstGame implements ApplicationListener {
- private Stage stage;
- Label label;
- Texture texture;
- Button button;
- @Override
- public void create() {
- stage = new Stage(Gdx.graphics.getWidth(), Gdx.graphics.getHeight(),
- true);
- texture = new Texture(Gdx.files.internal("06.png"));
- NinePatch n1 = new NinePatch(texture, 7, 7, 9, 9);
- BitmapFont bitmapFont = new BitmapFont(Gdx.files.internal("cf.fnt"),
- Gdx.files.internal("cf.png"), false);
- label = new Label("fpsLabel", bitmapFont, "label1");
- label.x = 5;
- label.y = Gdx.graphics.getHeight() - label.height - 5;
- stage.addActor(label);
- button = new Button("button", new ButtonStyle(n1, n1, n1, 0f, 0f, 0f,
- 0f, bitmapFont, new Color(1, 1, 0, 0.5f)), "button");
- button.x=10;
- button.y=10;
- button.width=100f;
- button.height=32f;
- stage.addActor(button);
- Gdx.input.setInputProcessor(stage);
- }
- @Override
- public void dispose() {
- stage.dispose();
- }
- @Override
- public void pause() {
- // TODO Auto-generated method stub
- }
- @Override
- public void render() {
- Gdx.gl.glClear(GL10.GL_COLOR_BUFFER_BIT);
- label.setWrappedText("FPS: " + Gdx.graphics.getFramesPerSecond(),
- HAlignment.CENTER);
- stage.act(Gdx.graphics.getDeltaTime());
- stage.draw();
- }
- @Override
- public void resize(int width, int height) {
- // TODO Auto-generated method stub
- }
- @Override
- public void resume() {
- // TODO Auto-generated method stub
- }
- }
效果:
按钮自然应该有点击事件,通过setClickListener来设置:
- button.setClickListener(new ClickListener() {
- @Override
- public void click(Actor actor) {
- Gdx.app.log("Info", "点击事件触发了");
- }
- });
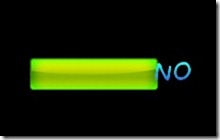
然后再看看CheckBox。CheckBox的样式定义在CheckBoxStyle中,需要4个参数,两种状态的各一张图片,一个BitmapFont和Color。
这里我再添加一张图片:

原理差不多,直接贴代码了。
- package com.cnblogs.htynkn.listener;
- import android.graphics.Paint.Align;
- import com.badlogic.gdx.ApplicationListener;
- import com.badlogic.gdx.Gdx;
- import com.badlogic.gdx.graphics.Color;
- import com.badlogic.gdx.graphics.GL10;
- import com.badlogic.gdx.graphics.Texture;
- import com.badlogic.gdx.graphics.g2d.BitmapFont;
- import com.badlogic.gdx.graphics.g2d.NinePatch;
- import com.badlogic.gdx.graphics.g2d.TextureRegion;
- import com.badlogic.gdx.graphics.g2d.BitmapFont.HAlignment;
- import com.badlogic.gdx.scenes.scene2d.Actor;
- import com.badlogic.gdx.scenes.scene2d.Stage;
- import com.badlogic.gdx.scenes.scene2d.actors.Label;
- import com.badlogic.gdx.scenes.scene2d.ui.Button;
- import com.badlogic.gdx.scenes.scene2d.ui.CheckBox;
- import com.badlogic.gdx.scenes.scene2d.ui.ClickListener;
- import com.badlogic.gdx.scenes.scene2d.ui.Button.ButtonStyle;
- import com.badlogic.gdx.scenes.scene2d.ui.CheckBox.CheckBoxStyle;
- public class FirstGame implements ApplicationListener {
- private Stage stage;
- Label label;
- Texture texture1;
- Texture texture2;
- CheckBox checkBox;
- @Override
- public void create() {
- stage = new Stage(Gdx.graphics.getWidth(), Gdx.graphics.getHeight(),
- true);
- texture1 = new Texture(Gdx.files.internal("06.png"));
- texture2 = new Texture(Gdx.files.internal("07.png"));
- NinePatch n1 = new NinePatch(texture1, 7, 7, 9, 9);
- BitmapFont bitmapFont = new BitmapFont(Gdx.files.internal("cf.fnt"),
- Gdx.files.internal("cf.png"), false);
- label = new Label("fpsLabel", bitmapFont, "label1");
- label.x = 5;
- label.y = Gdx.graphics.getHeight() - label.height - 5;
- CheckBoxStyle style = new CheckBoxStyle(new TextureRegion(texture1),
- new TextureRegion(texture2), bitmapFont, new Color(1, 1, 1,
- 0.5f));
- checkBox = new CheckBox("checkbox", style, "checkbox");
- checkBox.x = 100;
- checkBox.y = 100;
- checkBox.width = 158f;
- checkBox.height = 32f;
- checkBox.setText("Yes");
- checkBox.setClickListener(new ClickListener() {
- @Override
- public void click(Actor actor) {
- if (checkBox.isChecked) {
- checkBox.setText("Yes");
- } else {
- checkBox.setText("NO");
- }
- }
- });
- stage.addActor(checkBox);
- stage.addActor(label);
- Gdx.input.setInputProcessor(stage);
- }
- @Override
- public void dispose() {
- stage.dispose();
- }
- @Override
- public void pause() {
- // TODO Auto-generated method stub
- }
- @Override
- public void render() {
- Gdx.gl.glClear(GL10.GL_COLOR_BUFFER_BIT);
- label.setWrappedText("FPS: " + Gdx.graphics.getFramesPerSecond(),
- HAlignment.CENTER);
- stage.act(Gdx.graphics.getDeltaTime());
- stage.draw();
- }
- @Override
- public void resize(int width, int height) {
- // TODO Auto-generated method stub
- }
- @Override
- public void resume() {
- // TODO Auto-generated method stub
- }
- }
效果:

其他的UI大致用法差不多,显示的样式在对应的Style或者Skin中定义。但是要注意有些UI类需要手动设置width和height,不然有些显示会很奇怪的。
最后说一下Slider的用法。
SliderStyle需要一个NinePath和Texture,我最初没有想通为什么不是两个NinePath,仔细看一下源码才了解到,NinePath是作为背景,而Texture那个是中间的那个滑动的方块。
关于用配置文件设置Style的问题,google code的wiki上似乎没有写,但是在libgdx的论坛里面有,比如:
- somePatch1: [
- { height: 13, width: 9, x: 761, y: 78 },
- { height: 13, width: 1, x: 770, y: 78 },
- { height: 13, width: 9, x: 771, y: 78 },
- { height: 1, width: 9, x: 761, y: 91 },
- { height: 1, width: 1, x: 770, y: 91 },
- { height: 1, width: 9, x: 771, y: 91 },
- { height: 13, width: 9, x: 761, y: 92 },
- { height: 13, width: 1, x: 770, y: 92 },
- { height: 13, width: 9, x: 771, y: 92 }
- ]
或者
- somePatch2: [
- { height: 13, width: 9, x: 761, y: 78 },
- ]

发表评论:
◎欢迎参与讨论,请在这里发表您的看法、交流您的观点。