本文接上文:Android游戏引擎libgdx使用教程12:如何使用TiledMap地图
地图我们创建好了接下来就是主角的出现。其实上文介绍了如何TiledMap和Stage的结合,角色的处理就简单了。
可以继承Actor类创建主角类,我就偷个懒,用Image代替。
编辑我们的TMX文件,添加一个对象层。
在主角要出现的地方加个形状。
取名为play1。

我们的主角是:

思路是我们遍历map中的所有Object,如果名字和我们设定的play1一致,那么就实例化一个Image,位置和Object一致,添加到舞台。
关键代码:
- for (TiledObjectGroup group : map.objectGroups) {
- for (TiledObject object : group.objects) {
- if ("play1".equals(object.name)) {
- player = new Image(new TextureRegion(new Texture(Gdx.files
- .internal("map/player.png")), 0, 0, 27, 40));
- player.x = object.x;
- player.y = tileMapRenderer.getMapHeightUnits() - object.y; //map是左上角,Stage是左下角
- stage.addActor(player);
- }
- }
- }
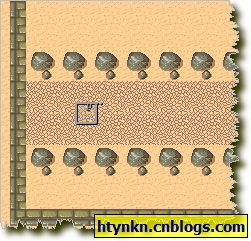
效果如下:

然后现在来试试让主角动起来。
首先是我们如何控制,android设备的话优先选用触控。如果我们按住前方不放,主角向前。按住上方不放,主角向上。
那么如何确定我们按住的是哪个方向呢?
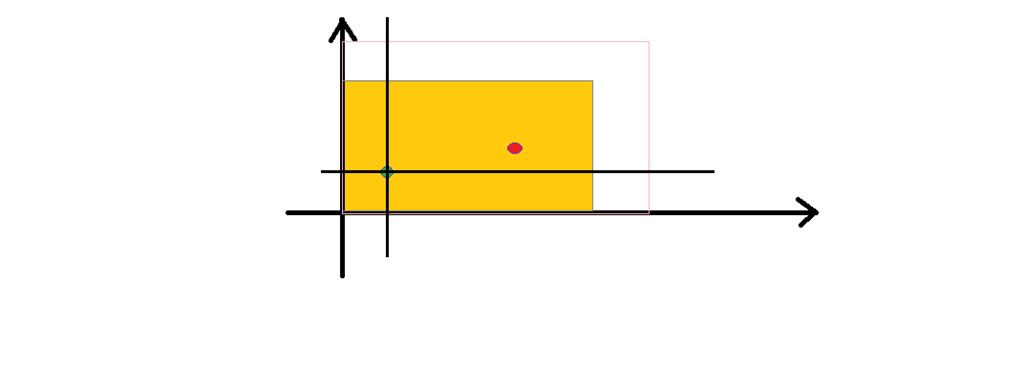
如图所示,黄色的是Stage,粉红的边框是整个Map,有部分显示,有一部分没有显示。右下角的绿色点是主角的位置,我们假定红色的点是我们的触碰点。
认定红色的触碰点为向前,我在提供一个方案,但是方法不唯一哈,我这样确定方向也不一定是最符合用户体验的。
以主角的位置为原点重现建立坐标系,得到触碰点的新坐标x,y。
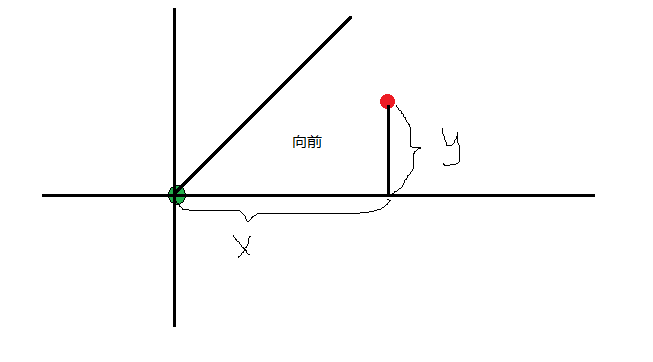
确定了在新坐标系下的触碰点的象限,在判断x,y的大小就可以知道方向了。
代码如下:
- Vector3 tmp = new Vector3(x, y, 0);
- stage.getCamera().unproject(tmp);
- float newx = tmp.x - player.x;
- float newy = tmp.y - player.y;
- if (newx > 0 && newy > 0) {
- if (newx > newy) {
- ChangeDirect(4);
- } else {
- ChangeDirect(1);
- }
- } else if (newx > 0 && newy < 0) {
- if (newx > -newy) {
- ChangeDirect(4);
- } else {
- ChangeDirect(2);
- }
- } else if (newx < 0 && newy > 0) {
- if (-newx > newy) {
- ChangeDirect(3);
- } else {
- ChangeDirect(1);
- }
- } else {
- if (-newx > -newy) {
- ChangeDirect(3);
- } else {
- ChangeDirect(2);
- }
- }
直接移动Camera位置可以移动地图,但是我们的主角却从地图上消失了…处理办法是将你希望仍然显示在地图上的Actor的坐标随着Camera一起移动。
代码如下:
- private void CameraMove(Vector3 vector3) {
- stage.getCamera().position.add(vector3);
- for (Actor actor : stage.getActors()) {
- actor.x += vector3.x;
- actor.y += vector3.y;
- }
- }
完整代码:
- package com.cnblogs.htynkn.game;
- import com.badlogic.gdx.ApplicationListener;
- import com.badlogic.gdx.Gdx;
- import com.badlogic.gdx.InputMultiplexer;
- import com.badlogic.gdx.InputProcessor;
- import com.badlogic.gdx.files.FileHandle;
- import com.badlogic.gdx.graphics.Color;
- import com.badlogic.gdx.graphics.GL10;
- import com.badlogic.gdx.graphics.OrthographicCamera;
- import com.badlogic.gdx.graphics.Texture;
- import com.badlogic.gdx.graphics.g2d.BitmapFont;
- import com.badlogic.gdx.graphics.g2d.TextureRegion;
- import com.badlogic.gdx.graphics.g2d.tiled.TileAtlas;
- import com.badlogic.gdx.graphics.g2d.tiled.TileMapRenderer;
- import com.badlogic.gdx.graphics.g2d.tiled.TiledLoader;
- import com.badlogic.gdx.graphics.g2d.tiled.TiledMap;
- import com.badlogic.gdx.graphics.g2d.tiled.TiledObject;
- import com.badlogic.gdx.graphics.g2d.tiled.TiledObjectGroup;
- import com.badlogic.gdx.math.Vector2;
- import com.badlogic.gdx.math.Vector3;
- import com.badlogic.gdx.scenes.scene2d.Actor;
- import com.badlogic.gdx.scenes.scene2d.Stage;
- import com.badlogic.gdx.scenes.scene2d.ui.Image;
- import com.badlogic.gdx.scenes.scene2d.ui.Label;
- import com.badlogic.gdx.scenes.scene2d.ui.Label.LabelStyle;
- public class firstGame implements ApplicationListener, InputProcessor {
- Stage stage;
- float width;
- float height;
- private TiledMap map;
- private TileAtlas atlas;
- private TileMapRenderer tileMapRenderer;
- Image player;
- Vector3 camDirection = new Vector3(1, 1, 0);
- Vector2 maxCamPosition = new Vector2(0, 0);
- Vector3 moveVector = new Vector3(0, 0, 0);
- boolean isPress;
- // Image image;
- @Override
- public void create() {
- final String path = "map/";
- final String mapname = "tilemap";
- FileHandle mapHandle = Gdx.files.internal(path + mapname + ".tmx");
- map = TiledLoader.createMap(mapHandle);
- atlas = new TileAtlas(map, Gdx.files.internal("map/"));
- tileMapRenderer = new TileMapRenderer(map, atlas, 10, 10);
- maxCamPosition.set(tileMapRenderer.getMapWidthUnits(), tileMapRenderer
- .getMapHeightUnits());
- width = Gdx.graphics.getWidth();
- height = Gdx.graphics.getHeight();
- stage = new Stage(width, height, true);
- Label label = new Label("FPS:", new LabelStyle(new BitmapFont(Gdx.files
- .internal("font/blue.fnt"),
- Gdx.files.internal("font/blue.png"), false), Color.WHITE),
- "fpsLabel");
- label.y = height - label.getPrefHeight();
- label.x = 0;
- stage.addActor(label);
- for (TiledObjectGroup group : map.objectGroups) {
- for (TiledObject object : group.objects) {
- if ("play1".equals(object.name)) {
- player = new Image(new TextureRegion(new Texture(Gdx.files
- .internal("map/player.png")), 0, 0, 27, 40));
- player.x = object.x;
- player.y = tileMapRenderer.getMapHeightUnits() - object.y; // map是左上角,Stage是左下角
- stage.addActor(player);
- }
- }
- }
- InputMultiplexer inputMultiplexer = new InputMultiplexer();
- inputMultiplexer.addProcessor(this);
- inputMultiplexer.addProcessor(stage);
- Gdx.input.setInputProcessor(inputMultiplexer);
- }
- @Override
- public void dispose() {
- // TODO Auto-generated method stub
- }
- @Override
- public void pause() {
- // TODO Auto-generated method stub
- }
- @Override
- public void render() {
- Gdx.gl.glClear(GL10.GL_COLOR_BUFFER_BIT);
- OrthographicCamera c = (OrthographicCamera) stage.getCamera();
- if (isPress) {
- CameraMove(moveVector);
- }
- ((Label) stage.findActor("fpsLabel")).setText("FPS: "
- + Gdx.graphics.getFramesPerSecond());
- stage.act(Gdx.graphics.getDeltaTime());
- tileMapRenderer.render(c);
- stage.draw();
- }
- private void CameraMove(Vector3 vector3) {
- stage.getCamera().position.add(vector3);
- for (Actor actor : stage.getActors()) {
- actor.x += vector3.x;
- actor.y += vector3.y;
- }
- }
- @Override
- public void resize(int width, int height) {
- // TODO Auto-generated method stub
- }
- @Override
- public void resume() {
- // TODO Auto-generated method stub
- }
- @Override
- public boolean keyDown(int keycode) {
- // TODO Auto-generated method stub
- return false;
- }
- @Override
- public boolean keyTyped(char character) {
- // TODO Auto-generated method stub
- return false;
- }
- @Override
- public boolean keyUp(int keycode) {
- // TODO Auto-generated method stub
- return false;
- }
- @Override
- public boolean scrolled(int amount) {
- // TODO Auto-generated method stub
- return false;
- }
- private void ChangeDirect(int typeId) {
- switch (typeId) {
- case 1:
- moveVector.set(0, 1, 0);
- Gdx.app.log("方向变动", "向上");
- break;
- case 2:
- moveVector.set(0, -1, 0);
- Gdx.app.log("方向变动", "向下");
- break;
- case 3:
- moveVector.set(-1, 0, 0);
- Gdx.app.log("方向变动", "向左");
- break;
- case 4:
- moveVector.set(1, 0, 0);
- Gdx.app.log("方向变动", "向右");
- break;
- }
- }
- @Override
- public boolean touchDown(int x, int y, int pointer, int button) {
- Vector3 tmp = new Vector3(x, y, 0);
- stage.getCamera().unproject(tmp);
- float newx = tmp.x - player.x;
- float newy = tmp.y - player.y;
- if (newx > 0 && newy > 0) {
- if (newx > newy) {
- ChangeDirect(4);
- } else {
- ChangeDirect(1);
- }
- } else if (newx > 0 && newy < 0) {
- if (newx > -newy) {
- ChangeDirect(4);
- } else {
- ChangeDirect(2);
- }
- } else if (newx < 0 && newy > 0) {
- if (-newx > newy) {
- ChangeDirect(3);
- } else {
- ChangeDirect(1);
- }
- } else {
- if (-newx > -newy) {
- ChangeDirect(3);
- } else {
- ChangeDirect(2);
- }
- }
- isPress = true;
- return false;
- }
- @Override
- public boolean touchDragged(int x, int y, int pointer) {
- // TODO Auto-generated method stub
- return false;
- }
- @Override
- public boolean touchMoved(int x, int y) {
- // TODO Auto-generated method stub
- return false;
- }
- @Override
- public boolean touchUp(int x, int y, int pointer, int button) {
- isPress = false;
- Gdx.app.log("Info", "touchUp: x:" + x + " y: " + y + " pointer: "
- + pointer + " button: " + button);
- return false;
- }
- }
我不知道怎么录制手机屏幕,所以只有用模拟机演示,但是真机速度很流畅,完全没问题。
如果有多个角色,方法是一样的,多建几个Object就行了。可以很明显看出,我们的忍者水平很高…行走地图完全没有障碍,而且如果你一直走的话会发现地图会消失一部分,这些问题接下的文章会慢慢解决的。

发表评论:
◎欢迎参与讨论,请在这里发表您的看法、交流您的观点。